SSM框架搭建项目 Spring+SpringMVC+Mybatis1、web工程入口 web工程入口好比javaSE工程的main函数,对于web工程而言,其入口便是web.xml。
web.xml分解 1.1加载spring配置文件 1 2 3 4 5 6 7 <context-param > <param-name > contextConfigLocation</param-name > <param-value > classpath*:spring-context*.xml</param-value > </context-param > <listener > <listener-class > org.springframework.web.context.ContextLoaderListener</listener-class > </listener >
1.1.1 Spring如何使用多个xml配置文件 1、在web.xml中定义contextConfigLocation参数,Spring会使用这个参数去加载所有逗号分隔的xml文件,如果没有这个参数,Spring默认加载web-inf/applicationContext.xml文件。 例如:
1 2 3 4 5 6 7 8 <context-param > <param-name > contextConfigLocation</param-name > <param-value > classpath*:conf/spring/applicationContext_core*.xml, classpath*:conf/spring/applicationContext_dict*.xml, classpath*:conf/spring/applicationContext_hibernate.xml, </param-value > </context-param >
ontextConfigLocation 参数的<param-value>定义了要装入的 Spring 配置文件。
原理:利用ServletContextListener 实现 Spring提供ServletContextListener 的一个实现类ContextLoaderListener ,该类可以作为listener 使用,它会在创建时自动查找WEB-INF/ 下的applicationContext.xml 文件。因此,如果只有一个配置文件,并且文件名为applicationContext.xml ,则只需在web.xml文件中增加如下代码即可:
1 2 3 <listener > <listener-class > org.springframework.web.context.ContextLoaderListener</listener-class > </listener >
如果没有contextConfigLocation 指定配置文件,则Spring 自动查找applicationContext.xml 配置文件。如果有contextConfigLocation,则利用该参数确定的配置文件。该参数指定的一个字符串,Spring 的ContextLoaderListener 负责将该字符串分解成多个配置文件,逗号”,”、空格” “及分号”;”都可作为字符串的分割符。如果既没有applicationContext.xml 文件,也没有使用contextConfigLocation参数确定配置文件,或者contextConfigLocation确定的配置文件不存在。都将导致Spring 无法加载配置文件或无法正常创建ApplicationContext 实例
1.2 字符过滤器 1 2 3 4 5 6 7 8 9 10 11 12 13 14 15 16 <filter > <filter-name > encodingFilter</filter-name > <filter-class > org.springframework.web.filter.CharacterEncodingFilter</filter-class > <init-param > <param-name > encoding</param-name > <param-value > UTF-8</param-value > </init-param > <init-param > <param-name > forceEncoding</param-name > <param-value > true</param-value > </init-param > </filter > <filter-mapping > <filter-name > encodingFilter</filter-name > <url-pattern > /*</url-pattern > </filter-mapping >
1.3 控制器(DisPatcher) 1 2 3 4 5 6 7 8 9 10 11 12 13 <servlet > <servlet-name > springServlet</servlet-name > <servlet-class > org.springframework.web.servlet.DispatcherServlet</servlet-class > <init-param > <param-name > contextConfigLocation</param-name > <param-value > classpath*:/spring-mvc*.xml</param-value > </init-param > <load-on-startup > 1</load-on-startup > </servlet > <servlet-mapping > <servlet-name > springServlet</servlet-name > <url-pattern > /</url-pattern > </servlet-mapping >
Spring 01.spring依赖关系
一、非web工程的spring使用
1、使用maven引入jar包:spring-context包
maven会自动引入spring-context依赖的包 !!!
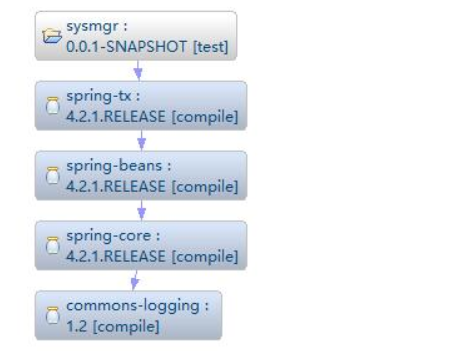
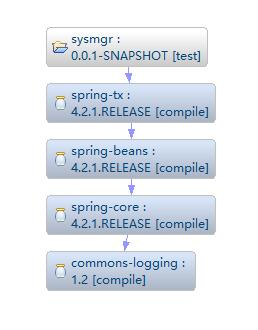
补充:spring各个jar包之间的依赖关系
https://blog.csdn.net/a909301740/article/details/78332991
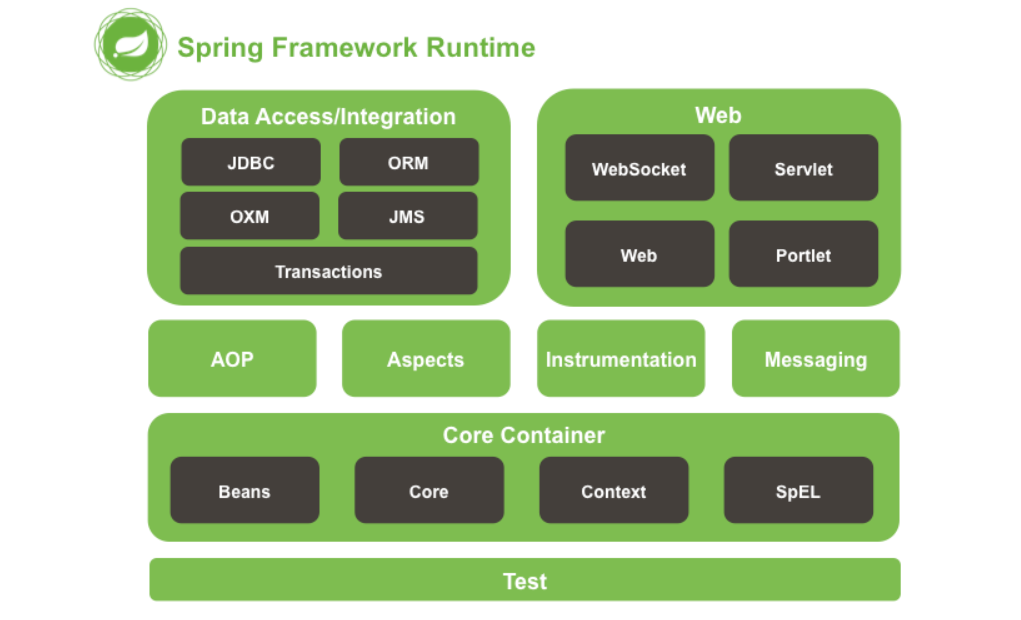
spring的主要模块:
IOC
core:资源访问,类型转换
beans:bean工厂
expression:${}获取属性
context:核心接口ApplicationContext
AOP
aop:面向切面编程的实现
aspects:对AspectJ的整合
DAO
jdbc:通过jdbc模板类访问数据库
tx:事务的实现
orm:与hibernate,mybatis的集成
oxm:对象与xml数据之间的相互转换
jms:系统之间发送消息,异步通信
Web
web:与web项目的整合
webmvc:子模块springMVC
Test
spring-core的依赖关系:core只依赖commons-logging
2、spring-beans:beans依赖于core
spring-expression:expression和beans一样依赖于core
02.Spring Web Spring 整合 Web 容器初始化 启动容器时需要自动装载 ApplicationContext,Spring 提供的 ContextLoaderListener 就是为了自动装配 ApplicationContext 的配置信息
pom.xml 需要在 pom.xml 增加 org.springframework:spring-web 依赖
1 2 3 4 5 6 7 8 9 10 11 12 <dependency > <groupId > javax.servlet</groupId > <artifactId > javax.servlet-api</artifactId > <version > 3.1.0</version > <scope > provided</scope > </dependency > <dependency > <groupId > org.springframework</groupId > <artifactId > spring-web</artifactId > <version > 4.3.17.RELEASE</version > </dependency >
配置web.xml 1 2 3 4 5 6 7 8 9 10 11 12 13 14 <?xml version="1.0" encoding="UTF-8"?> <web-app xmlns ="http://xmlns.jcp.org/xml/ns/javaee" xmlns:xsi ="http://www.w3.org/2001/XMLSchema-instance" xsi:schemaLocation ="http://xmlns.jcp.org/xml/ns/javaee http://xmlns.jcp.org/xml/ns/javaee/web-app_3_1.xsd" version ="3.1" > <context-param > <param-name > contextConfigLocation</param-name > <param-value > classpath:spring-context*.xml</param-value > </context-param > <listener > <listener-class > org.springframework.web.context.ContextLoaderListener</listener-class > </listener > </web-app >
ApplicationContextAware当一个类实现了这个接口(ApplicationContextAware)之后,这个类就可以方便获得 ApplicationContext 中的所有 bean。换句话说,就是这个类可以直接获取 Spring 配置文件中,所有有引用到的 Bean 对象。
1 2 3 4 5 6 7 8 9 10 11 12 13 14 15 16 17 18 19 20 21 22 23 24 25 26 27 28 29 30 31 32 33 34 35 36 37 38 39 40 41 42 43 44 45 46 47 48 49 50 51 52 53 54 55 56 57 58 59 60 61 62 63 64 65 66 67 package com.funtl.my.shop.commons.context;import org.apache.commons.lang3.Validate;import org.slf4j.Logger;import org.slf4j.LoggerFactory;import org.springframework.beans.BeansException;import org.springframework.beans.factory.DisposableBean;import org.springframework.context.ApplicationContext;import org.springframework.context.ApplicationContextAware;public class SpringContext implements ApplicationContextAware , DisposableBean private static final Logger logger = LoggerFactory.getLogger(SpringContext.class); private static ApplicationContext applicationContext ; public void destroy () throws Exception logger.debug("清除 SpringContext 中的 ApplicationContext: {}" , applicationContext); applicationContext = null ; } @Override public void setApplicationContext (ApplicationContext applicationContext) throws BeansException SpringContext.applicationContext = applicationContext; } public static ApplicationContext getApplicationContext () return applicationContext; } public static <T> T getBean (String beanId) { return (T) applicationContext.getBean(beanId); } public static <T> T getBean (Class<T> clazz) { assertContextInjected(); return applicationContext.getBean(clazz); } private static void assertContextInjected () Validate.validState(applicationContext != null , "applicationContext 属性未注入,请在 spring-context.xml 配置中定义 SpringContext" ); } }
补充:需要在spring-context中装配SpringContext对象
1 <bean id ="springContext" class ="com.funtl.my.shop.commons.context.SpringContext" />
附录:完整的POM.xml 1 2 3 4 5 6 7 8 9 10 11 12 13 14 15 16 17 18 19 20 21 22 23 24 25 26 27 28 29 30 31 32 33 34 35 36 37 38 39 40 41 42 43 44 45 46 47 48 49 50 51 52 53 54 55 56 57 58 59 60 61 62 63 64 65 66 67 <?xml version="1.0" encoding="UTF-8"?> <project xmlns ="http://maven.apache.org/POM/4.0.0" xmlns:xsi ="http://www.w3.org/2001/XMLSchema-instance" xsi:schemaLocation ="http://maven.apache.org/POM/4.0.0 http://maven.apache.org/xsd/maven-4.0.0.xsd" > <modelVersion > 4.0.0</modelVersion > <groupId > com.funtl</groupId > <artifactId > my-shop</artifactId > <version > 1.0.0-SNAPSHOT</version > <packaging > war</packaging > <properties > <spring.version > 4.3.17.RELEASE</spring.version > <junit.version > 4.12</junit.version > <servlet.version > 4.0.1</servlet.version > <slf4j.version > 1.7.25</slf4j.version > </properties > <dependencies > <dependency > <groupId > org.springframework</groupId > <artifactId > spring-context</artifactId > <version > ${spring.version}</version > </dependency > <dependency > <groupId > org.springframework</groupId > <artifactId > spring-web</artifactId > <version > ${spring.version}</version > </dependency > <dependency > <groupId > junit</groupId > <artifactId > junit</artifactId > <version > ${junit.version}</version > </dependency > <dependency > <groupId > javax.servlet</groupId > <artifactId > javax.servlet-api</artifactId > <version > ${servlet.version}</version > <scope > provided</scope > </dependency > <dependency > <groupId > org.slf4j</groupId > <artifactId > log4j-over-slf4j</artifactId > <version > ${slf4j.version}</version > </dependency > <dependency > <groupId > org.apache.commons</groupId > <artifactId > commons-lang3</artifactId > <version > 3.5</version > </dependency > </dependencies > <build > <plugins > <plugin > <groupId > org.apache.maven.plugins</groupId > <artifactId > maven-compiler-plugin</artifactId > <configuration > <source > 1.8</source > <target > 1.8</target > </configuration > </plugin > </plugins > </build > </project >
完整的web.xml 1 2 3 4 5 6 7 8 9 10 11 12 13 14 15 16 17 18 19 20 21 22 23 24 <?xml version="1.0" encoding="UTF-8"?> <web-app xmlns ="http://xmlns.jcp.org/xml/ns/javaee" xmlns:xsi ="http://www.w3.org/2001/XMLSchema-instance" xsi:schemaLocation ="http://xmlns.jcp.org/xml/ns/javaee http://xmlns.jcp.org/xml/ns/javaee/web-app_4_0.xsd" version ="4.0" > <context-param > <param-name > contextConfigLocation</param-name > <param-value > classpath*:spring-context.xml</param-value > </context-param > <listener > <listener-class > org.springframework.web.context.ContextLoaderListener</listener-class > </listener > <servlet > <servlet-name > LoginController</servlet-name > <servlet-class > com.funtl.my.shop.web.controller.LoginController</servlet-class > </servlet > <servlet-mapping > <servlet-name > LoginController</servlet-name > <url-pattern > /login</url-pattern > </servlet-mapping > </web-app >
完整的spring-context.xml 1 2 3 4 5 6 7 8 9 10 11 <?xml version="1.0" encoding="UTF-8"?> <beans xmlns ="http://www.springframework.org/schema/beans" xmlns:xsi ="http://www.w3.org/2001/XMLSchema-instance" xsi:schemaLocation =" http://www.springframework.org/schema/beans http://www.springframework.org/schema/beans/spring-beans-4.3.xsd" > <bean id ="userDao" class ="com.funtl.my.shop.dao.impl.UserDaoImpl" /> <bean id ="springContext" class ="com.funtl.my.shop.commons.context.SpringContext" /> <bean id ="userService" class ="com.funtl.my.shop.service.impl.UserServiceImpl" /> </beans >
Bean 的装配方式 概述 截止目前为止,咱们 Bean 的装配方式是通过代码 getBean() 的方式从容器获取指定的 Bean 实例,容器首先会调用 Bean 类的无参构造器,创建空值的实例对象。除了使用 getBean() 的装配方式外,还可以使用注解的装配方式
容器中 Bean 的作用域 在学习 Bean 的装配方式之前,我们先了解一下 Bean 的作用域。当通过 Spring 容器创建一个 Bean 实例时,不仅可以完成 Bean 的实例化,还可以通过 scope 属性,为 Bean 指定特定的作用域。Spring 支持 5 种作用域。
singleton:单态模式。即在整个 Spring 容器中,使用 singleton 定义的 Bean 将是单例的,只有一个实例。默认为单态的。
prototype:原型模式。即每次使用 getBean 方法获取的同一个 <bean /> 的实例都是一个新的实例。
request:对于每次 HTTP 请求,都将会产生一个不同的 Bean 实例。
session:对于每个不同的 HTTP session,都将产生一个不同的 Bean 实例。
global session:每个全局的 HTTP session 对应一个 Bean 实例。典型情况下,仅在使用 portlet 集群时有效,多个 Web 应用共享一个 session。一般应用中,global-session 与 session 是等同的。
注意事项:
对于 scope 的值 request、session 与 global session,只有在 Web 应用中使用 Spring 时,该作用域才有效。
对于 scope 为 singleton 的单例模式,该 Bean 是在容器被创建时即被装配好了。
对于 scope 为 prototype 的原型模式,Bean 实例是在代码中使用该 Bean 实例时才进行装配的
基于注解的装配方式
对于 DI 使用注解,将不再需要在 Spring 配置文件中声明 Bean 实例。Spring 中使用注解, 需要在原有 Spring 运行环境基础上再做一些改变
需要在 Spring 配置文件中配置组件扫描器,用于在指定的基本包中扫描注解
spring-context.xml 配置组件扫描器,用于在指定的基本包中扫描注解
1 2 3 4 5 6 7 8 9 10 11 12 <?xml version="1.0" encoding="UTF-8"?> <beans xmlns ="http://www.springframework.org/schema/beans" xmlns:xsi ="http://www.w3.org/2001/XMLSchema-instance" xmlns:context ="http://www.springframework.org/schema/context" xsi:schemaLocation =" http://www.springframework.org/schema/beans http://www.springframework.org/schema/beans/spring-beans.xsd http://www.springframework.org/schema/context http://www.springframework.org/schema/context/spring-context.xsd " > <context:annotation-config /> <context:component-scan base-package ="com.funtl.leeshop" /> </beans >
常用的注解
@Repository:用于对 DAO 实现类进行注解@Service:用于对 Service 实现类进行注解@Controller:用于对 Controller 实现类进行注解@Component:当该类不是MVC层次的类时,考虑用该注解
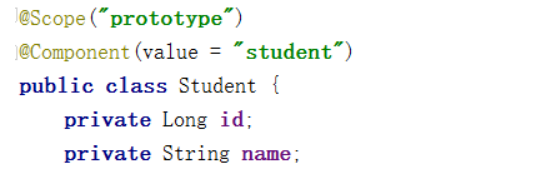
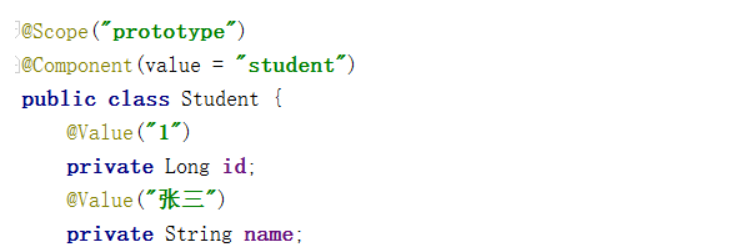
@Component需要在类上使用注解 @Component,该注解的 value属性用于指定该 bean 的 id 值。
1 2 3 4 5 6 7 8 9 10 11 12 13 14 15 16 17 18 19 20 21 22 23 24 25 26 27 28 29 @Component(value = "student") public class Student private Long id; private String name; public Long getId () return id; } public void setId (Long id) this .id = id; } public String getName () return name; } public void setName (String name) this .name = name; } @Override public String toString () return "Student{" + "id=" + id + ", name='" + name + '\'' + '}' ; } }
@Scope需要在类上使用注解 @Scope,其 value 属性用于指定作用域。默认为 singleton。
@Value需要在属性上使用注解 @Value,该注解的 value 属性用于指定要注入的值。
使用该注解完成属性注入时,类中无需 setter。当然,若属性有 setter,则也可将其加到 setter 上。
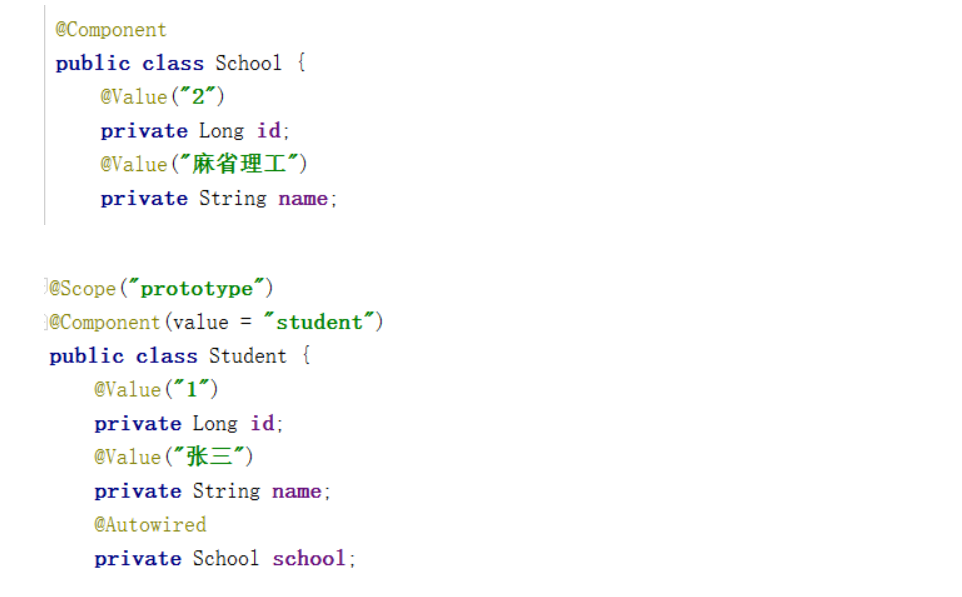
@Autowired需要在域属性上使用注解 @Autowired,该注解默认使用 按类型自动装配 Bean 的方式。
使用该注解完成属性注入时,类中无需 setter。当然,若属性有 setter,则也可将其加到 setter 上。
注明:Student类自动注入school实例,相当于:
1 private Schoool school = new School();
@Resource需要在域属性上使用注解 @Resource,该注解有一个 name 属性,可以创建指定的 bean
1 @Resource(name = "userService") private UserService userService;
@PostConstruct在方法上使用 @PostConstruct相当于初始化
注解与 XML 配置的区别 注解的好处是,配置方便,直观。但其弊端也显而易见:以硬编码的方式写入到了 Java 代码中,其修改是需要重新编译代码的。
XML 配置方式的最大好处是,对其所做修改,无需编译代码,只需重启服务器即可将新的配置加载。
若注解与 XML 同用,XML 的优先级要高于注解。这样做的好处是,需要对某个 Bean 做修改,只需修改配置文件即可。
浏览器端存储技术简介 Cookie Cookie 是指存储在用户本地终端上的数据,同时它是与具体的 Web 页面或者站点相关的。Cookie 数据会自动在 Web 浏览器和 Web 服务器之间传输,也就是说 HTTP 请求发送时,会把保存在该请求域名下的所有 Cookie 值发送给 Web 服务器,因此服务器端脚本是可以读、写存储在客户端的 Cookie 的操作。
LocalStorage 在 HTML5 中,新加入了一个 localStorage 特性,这个特性主要是用来作为本地存储来使用的,解决了 Cookie 存储空间不足的问题(Cookie 中每条 Cookie 的存储空间为 4k),localStorage 中一般浏览器支持的是 5M 大小,这个在不同的浏览器中 localStorage 会有所不同 !
SessionStorage SessionStorage 与 LocalStorage 的唯一一点区别就是 LocalStorage 属于永久性存储,而 SessionStorage 属于当会话结束的时候,SessionStorage 中的键值对就会被清空。
UserData、GlobalStorage、Google Gear 这三种的使用都有一定的局限性,例如
userData 是 IE 浏览器专属,它的容量可以达到 640K,这种方案可靠,不需要安装额外插件,只不过它仅在IE下有效
globalStorage 适用于 Firefox 2+ 的浏览器,类似于 IE 的 userData
google gear 是谷歌开发出的一种本地存储技术,需要安装 Gear 组件
Flash ShareObject(Flash Cookie) 这种方式能能解决上面提到的 Cookie 存储的两个弊端,而且能够跨浏览器,应该说是目前最好的本地存储方案。不过,需要在页面中插入一个 Flash,当浏览器没有安装 Flash 控件时就不能用了。所幸的是,没有安装 Flash 的用户极少
CookieUtils 1 2 3 4 5 6 7 8 9 10 11 12 13 14 15 16 17 18 19 20 21 22 23 24 25 26 27 28 29 30 31 32 33 34 35 36 37 38 39 40 41 42 43 44 45 46 47 48 49 50 51 52 53 54 55 56 57 58 59 60 61 62 63 64 65 66 67 68 69 70 71 72 73 74 75 76 77 78 79 80 81 82 83 84 85 86 87 88 89 90 91 92 93 94 95 96 97 98 99 100 101 102 103 104 105 106 107 108 109 110 111 112 113 114 115 116 117 118 119 120 121 122 123 124 125 126 127 128 129 130 131 132 133 134 135 136 137 138 139 140 141 142 143 144 145 146 147 148 149 150 151 152 153 154 155 156 157 158 159 160 161 162 163 164 165 166 167 168 169 170 171 172 173 174 175 176 177 178 179 180 181 182 183 184 185 186 187 188 189 190 191 192 193 194 195 196 197 198 199 200 201 202 203 204 205 206 207 208 209 210 211 212 213 214 215 216 217 218 219 220 221 222 223 224 225 226 227 228 229 230 package com.funtl.leeshop.commons.utils;import javax.servlet.http.Cookie;import javax.servlet.http.HttpServletRequest;import javax.servlet.http.HttpServletResponse;import java.io.UnsupportedEncodingException;import java.net.URLDecoder;import java.net.URLEncoder;public final class CookieUtils public static String getCookieValue (HttpServletRequest request, String cookieName) return getCookieValue(request, cookieName, false ); } public static String getCookieValue (HttpServletRequest request, String cookieName, boolean isDecoder) Cookie[] cookieList = request.getCookies(); if (cookieList == null || cookieName == null ) { return null ; } String retValue = null ; try { for (int i = 0 ; i < cookieList.length; i++) { if (cookieList[i].getName().equals(cookieName)) { if (isDecoder) { retValue = URLDecoder.decode(cookieList[i].getValue(), "UTF-8" ); } else { retValue = cookieList[i].getValue(); } break ; } } } catch (UnsupportedEncodingException e) { e.printStackTrace(); } return retValue; } public static String getCookieValue (HttpServletRequest request, String cookieName, String encodeString) Cookie[] cookieList = request.getCookies(); if (cookieList == null || cookieName == null ) { return null ; } String retValue = null ; try { for (int i = 0 ; i < cookieList.length; i++) { if (cookieList[i].getName().equals(cookieName)) { retValue = URLDecoder.decode(cookieList[i].getValue(), encodeString); break ; } } } catch (UnsupportedEncodingException e) { e.printStackTrace(); } return retValue; } public static void setCookie (HttpServletRequest request, HttpServletResponse response, String cookieName, String cookieValue) setCookie(request, response, cookieName, cookieValue, -1 ); } public static void setCookie (HttpServletRequest request, HttpServletResponse response, String cookieName, String cookieValue, int cookieMaxage) setCookie(request, response, cookieName, cookieValue, cookieMaxage, false ); } public static void setCookie (HttpServletRequest request, HttpServletResponse response, String cookieName, String cookieValue, boolean isEncode) setCookie(request, response, cookieName, cookieValue, -1 , isEncode); } public static void setCookie (HttpServletRequest request, HttpServletResponse response, String cookieName, String cookieValue, int cookieMaxage, boolean isEncode) doSetCookie(request, response, cookieName, cookieValue, cookieMaxage, isEncode); } public static void setCookie (HttpServletRequest request, HttpServletResponse response, String cookieName, String cookieValue, int cookieMaxage, String encodeString) doSetCookie(request, response, cookieName, cookieValue, cookieMaxage, encodeString); } public static void deleteCookie (HttpServletRequest request, HttpServletResponse response, String cookieName) doSetCookie(request, response, cookieName, "" , -1 , false ); } private static final void doSetCookie (HttpServletRequest request, HttpServletResponse response, String cookieName, String cookieValue, int cookieMaxage, boolean isEncode) try { if (cookieValue == null ) { cookieValue = "" ; } else if (isEncode) { cookieValue = URLEncoder.encode(cookieValue, "utf-8" ); } Cookie cookie = new Cookie(cookieName, cookieValue); if (cookieMaxage > 0 ) cookie.setMaxAge(cookieMaxage); if (null != request) { String domainName = getDomainName(request); if (!"localhost" .equals(domainName)) { cookie.setDomain(domainName); } } cookie.setPath("/" ); response.addCookie(cookie); } catch (Exception e) { e.printStackTrace(); } } private static final void doSetCookie (HttpServletRequest request, HttpServletResponse response, String cookieName, String cookieValue, int cookieMaxage, String encodeString) try { if (cookieValue == null ) { cookieValue = "" ; } else { cookieValue = URLEncoder.encode(cookieValue, encodeString); } Cookie cookie = new Cookie(cookieName, cookieValue); if (cookieMaxage > 0 ) cookie.setMaxAge(cookieMaxage); if (null != request) { String domainName = getDomainName(request); if (!"localhost" .equals(domainName)) { cookie.setDomain(domainName); } } cookie.setPath("/" ); response.addCookie(cookie); } catch (Exception e) { e.printStackTrace(); } } private static final String getDomainName (HttpServletRequest request) String domainName = null ; String serverName = request.getRequestURL().toString(); if (serverName == null || serverName.equals("" )) { domainName = "" ; } else { serverName = serverName.toLowerCase(); serverName = serverName.substring(7 ); final int end = serverName.indexOf("/" ); serverName = serverName.substring(0 , end); final String[] domains = serverName.split("\\." ); int len = domains.length; if (len > 3 ) { domainName = "." + domains[len - 3 ] + "." + domains[len - 2 ] + "." + domains[len - 1 ]; } else if (len <= 3 && len > 1 ) { domainName = "." + domains[len - 2 ] + "." + domains[len - 1 ]; } else { domainName = serverName; } } if (domainName != null && domainName.indexOf(":" ) > 0 ) { String[] ary = domainName.split("\\:" ); domainName = ary[0 ]; } return domainName; } }
SpringMVC 00.简介 概述 Spring MVC 也叫 Spring Web MVC ,属于展示层框架。SpringMVC 是 Spring 框架的一部分。
Spring Web MVC 框架提供了 MVC (模型 - 视图 - 控制器) 架构和用于开发灵活和松散耦合的 Web 应用程序的组件。 MVC 模式导致应用程序的不同方面(输入逻辑,业务逻辑和 UI 逻辑)分离,同时提供这些元素之间的松散耦合。
模型 (Model):封装了应用程序数据,通常它们将由 POJO 类组成。
视图 (View):负责渲染模型数据,一般来说它生成客户端浏览器可以解释 HTML 输出。
控制器 (Controller):负责处理用户请求并构建适当的模型,并将其传递给视图进行渲染
【注】 Servlet 使用不灵活 每创建一个Servlet都需要到web.xml中配置一次 默认调用doGet或者doPost方法
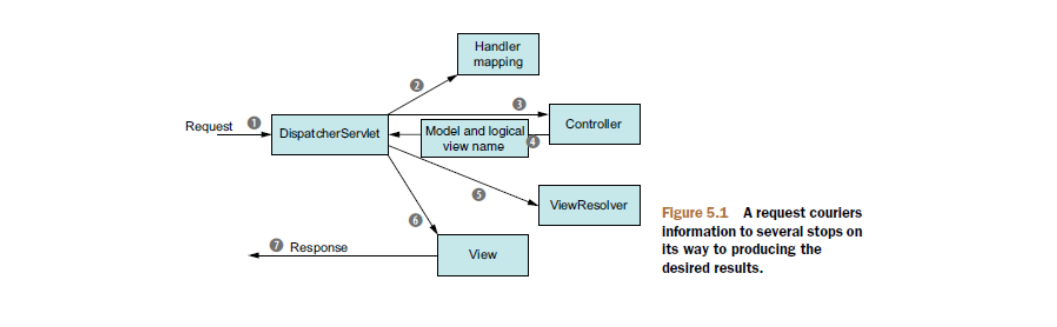
DispatcherServlet 组件类 Spring Web MVC 框架是围绕 DispatcherServlet 设计的,它处理所有的 HTTP 请求和响应。 Spring Web MVC DispatcherServlet 的请求处理工作流如下图所示:
以下是对应于到 DispatcherServlet 的传入 HTTP 请求的事件顺序:
在接收到 HTTP 请求后,DispatcherServlet 会查询 HandlerMapping 以调用相应的 Controller。
Controller 接受请求并根据使用的 GET 或 POST 方法调用相应的服务方法。
服务方法将基于定义的业务逻辑设置模型数据,并将视图名称返回给 DispatcherServlet。
DispatcherServlet 将从 ViewResolver 获取请求的定义视图。
当视图完成,DispatcherServlet 将模型数据传递到最终的视图,并在浏览器上呈现。
所有上述组件,即: HandlerMapping,Controller 和 ViewResolver 是 WebApplicationContext 的一部分,它是普通 ApplicationContext 的扩展,带有 Web 应用程序所需的一些额外功能。
01.Spring 整合 Spring MVC POM 在 pom.xml 配置文件中增加 org.springframework:spring-webmvc 依赖
1 2 3 4 5 <dependency > <groupId > org.springframework</groupId > <artifactId > spring-webmvc</artifactId > <version > 4.3.17.RELEASE</version > </dependency >
配置 web.xml CharacterEncodingFilter 配置字符集过滤器,用于解决中文编码问题
1 2 3 4 5 6 7 8 9 10 11 12 13 14 15 16 <filter > <filter-name > encodingFilter</filter-name > <filter-class > org.springframework.web.filter.CharacterEncodingFilter</filter-class > <init-param > <param-name > encoding</param-name > <param-value > UTF-8</param-value > </init-param > <init-param > <param-name > forceEncoding</param-name > <param-value > true</param-value > </init-param > </filter > <filter-mapping > <filter-name > encodingFilter</filter-name > <url-pattern > /*</url-pattern > </filter-mapping >
DispatcherServlet 配置 Spring 的 Servlet 分发器处理所有 HTTP 的请求和响应
1 2 3 4 5 6 7 8 9 10 11 12 13 <servlet > <servlet-name > springServlet</servlet-name > <servlet-class > org.springframework.web.servlet.DispatcherServlet</servlet-class > <init-param > <param-name > contextConfigLocation</param-name > <param-value > classpath*:/spring-mvc*.xml</param-value > </init-param > <load-on-startup > 1</load-on-startup > </servlet > <servlet-mapping > <servlet-name > springServlet</servlet-name > <url-pattern > /</url-pattern > </servlet-mapping >
配置 Spring MVC 创建一个名为 spring-mvc.xml 文件来配置 MVC
1 2 3 4 5 6 7 8 9 10 11 12 13 14 15 16 17 18 19 20 21 22 23 24 25 26 27 28 29 30 <?xml version="1.0" encoding="UTF-8"?> <beans xmlns ="http://www.springframework.org/schema/beans" xmlns:xsi ="http://www.w3.org/2001/XMLSchema-instance" xmlns:context ="http://www.springframework.org/schema/context" xmlns:mvc ="http://www.springframework.org/schema/mvc" xsi:schemaLocation ="http://www.springframework.org/schema/beans http://www.springframework.org/schema/beans/spring-beans.xsd http://www.springframework.org/schema/context http://www.springframework.org/schema/context/spring-context.xsd http://www.springframework.org/schema/mvc http://www.springframework.org/schema/mvc/spring-mvc.xsd" > <description > Spring MVC Configuration</description > <context:property-placeholder ignore-unresolvable ="true" location ="classpath:myshop.properties" /> <context:component-scan base-package ="com.lusifer.myshop" use-default-filters ="false" > <context:include-filter type ="annotation" expression ="org.springframework.stereotype.Controller" /> </context:component-scan > <mvc:annotation-driven /> <bean class ="org.springframework.web.servlet.view.InternalResourceViewResolver" > <property name ="prefix" value ="${web.view.prefix}" /> <property name ="suffix" value ="${web.view.suffix}" /> </bean > <mvc:resources mapping ="/static/**" location ="/static/" cache-period ="31536000" /> </beans >
相关配置说明:
context:property-placeholder:动态加载属性配置文件以变量的方式引用需要的值context:component-scan:当前配置文件为 MVC 相关,故只需要扫描包含 @Controller 的注解即可,由于 spring-context.xml 配置文件中也配置了包扫描,所以还需要排除 @Controller 的注解扫描。InternalResourceViewResolver:视图文件解析器的一种,用于配置视图资源的路径和需要解释的视图资源文件类型,这里有两个需要配置的属性 prefix(前缀)以及 suffix(后缀)。
prefix:配置视图资源路径,如:/WEB-INF/views/suffix:配置视图资源类型,如:.jsp
mvc:resources:静态资源映射,主要用于配置静态资源文件存放路径,如:JS、CSS、Image 等
系统相关配置 在 spring-mvc.xnl 中,我们配置了 <context:property-placeholder ignore-unresolvable="true" location="classpath:myshop.properties"/> 用于动态加载属性配置文件,实际开发中我们会将系统所需的一些配置信息封装到 .properties 配置文件中便于统一的管理。
创建一个名为 myshop.properties 的配置文件,内容如下:
1 2 3 4 5 6 7 #============================# #==== Framework settings ====# #============================# # \u89c6\u56fe\u6587\u4ef6\u5b58\u653e\u8def\u5f84 web.view.prefix=/WEB-INF/views/ web.view.suffix=.jsp
去掉 Spring 配置的重复扫描 由于 spring-mvc.xml 中已经配置了 @Controller 注解的扫描而 spring-context.xml 中配置的是扫描全部注解,故在这里需要将 @Controller 注解的扫描配置排除。
修改 spring-context.xml 配置:
1 2 3 4 <context:component-scan base-package ="com.funtl.my.shop" > <context:exclude-filter type ="annotation" expression ="org.springframework.stereotype.Controller" /> </context:component-scan >
第一个 Controller 控制器 概述 1 2 3 4 5 6 7 8 9 10 11 12 13 14 15 16 17 18 19 20 21 22 23 24 25 package com.funtl.my.shop.web.controller;import com.funtl.my.shop.service.UserService;import org.springframework.beans.factory.annotation.Autowired;import org.springframework.stereotype.Controller;import org.springframework.web.bind.annotation.RequestMapping;import org.springframework.web.bind.annotation.RequestMethod;import org.springframework.web.bind.annotation.RequestParam;@Controller public class LoginController @Autowired private UserService userService; @RequestMapping(value = {"", "login"}, method = RequestMethod.GET) public String login () return "login" ; } @RequestMapping(value = "login", method = RequestMethod.POST) public String login (@RequestParam(required = true) String email, @RequestParam(required = true) String password) return "redirect:/main" ; } }
注解说明 @Controller 在 Spring MVC 中,控制器 Controller 负责处理由 DispatcherServlet 分发的请求,它把用户请求的数据经过业务处理层处理之后封装成一个 Model ,然后再把该 Model 返回给对应的 View 进行展示。在 Spring MVC 中提供了一个非常简便的定义 Controller 的方法,你无需继承特定的类或实现特定的接口,只需使用 @Controller 标记一个类是 Controller ,然后使用 @RequestMapping 和 @RequestParam 等一些注解用以定义 URL 请求和 Controller 方法之间的映射,这样的 Controller 就能被外界访问到。此外 Controller 不会直接依赖于 HttpServletRequest 和 HttpServletResponse 等 HttpServlet 对象,它们可以通过 Controller 的方法参数灵活的获取到。
@Controller 用于标记在一个类上,使用它标记的类就是一个 Spring MVC Controller 对象。分发处理器将会扫描使用了该注解的类的方法,并检测该方法是否使用了 @RequestMapping 注解。@Controller 只是定义了一个控制器类,而使用 @RequestMapping 注解的方法才是真正处理请求的处理器。
@RequestMapping RequestMapping 是一个用来处理请求地址映射的注解,可用于类或方法上。用于类上,表示类中的所有响应请求的方法都是以该地址作为父路径 。
RequestMapping 注解有六个属性:
value, method
value:指定请求的实际地址,指定的地址可以是 URI Template 模式
method:指定请求的method类型, GET、POST、PUT、DELETE 等
consumes,produces
consumes:指定处理请求的提交内容类型(Content-Type),例如 application/json, text/html
produces: 指定返回的内容类型,仅当 request 请求头中的(Accept)类型中包含该指定类型才返回
params,headers
params:指定 request 中必须包含某些参数值是,才让该方法处理
headers:指定 request 中必须包含某些指定的 header 值,才能让该方法处理请求
Spring MVC 拦截器的使用 拦截器简介 Spring Web MVC 的处理器拦截器,类似于 Servlet 开发中的过滤器 Filter,用于对处理器进行预处理和后处理。
常见应用场景 日志记录:记录请求信息的日志,以便进行信息监控、信息统计、计算 PV(Page View)等
权限检查:如登录检测,进入处理器检测检测是否登录,如果没有直接返回到登录页面
性能监控:有时候系统在某段时间莫名其妙的慢,可以通过拦截器在进入处理器之前记录开始时间,在处理完后记录结束时间,从而得到该请求的处理时间
通用行为:读取 Cookie 得到用户信息并将用户对象放入请求,从而方便后续流程使用,还有如提取 Locale、Theme 信息等,只要是多个处理器都需要的即可使用拦截器实现
第一个 Spring MVC 拦截器 Spring MVC 拦截器需要实现 HandlerInterceptor 接口,该接口定义了 3 个方法,分别为preHandle()、postHandle()和 afterCompletion(),咱们就是通过重写这 3 个方法来对用户的请求进行拦截处理.
preHandle(HttpServletRequest request, HttpServletResponse response, Object handle):该方法在请求处理之前进行调用。Spring MVC 中的 Interceptor 是链式调用的,在一个应用中或者说是在一个请求中可以同时存在多个Interceptor 。每个 Interceptor 的调用会依据它的声明顺序依次执行,而且最先执行的都是 Interceptor 中的 preHandle 方法,所以可以在这个方法中进行一些前置初始化操作或者是对当前请求做一个预处理,也可以在这个方法中进行一些判断来决定请求是否要继续进行下去。该方法的返回值是布尔值 Boolean 类型的,当它返回为false 时,表示请求结束,后续的Interceptor 和 Controller 都不会再执行;当返回值为 true 时,就会继续调用下一个 Interceptor 的 preHandle 方法,如果已经是最后一个Interceptor 的时候,就会是调用当前请求的Controller 中的方法
postHandle(HttpServletRequest request, HttpServletResponse response, Object handle, ModelAndView modelAndView):通过 preHandle 方法的解释咱们知道这个方法包括后面要说到的 afterCompletion 方法都只能在当前所属的 Interceptor 的 preHandle 方法的返回值为 true 的时候,才能被调用。postHandle 方法在当前请求进行处理之后,也就是在 Controller 中的方法调用之后执行,但是它会在 DispatcherServlet 进行视图返回渲染之前被调用,所以咱们可以在这个方法中对 Controller 处理之后的 ModelAndView 对象进行操作。postHandle 方法被调用的方向跟 preHandle 是相反的,也就是说,先声明的 Interceptor 的 postHandle 方法反而会后执行。
afterCompletion(HttpServletRequest request, HttpServletResponse response, Object handle, Exception ex):也是需要当前对应的 Interceptor 的 preHandle 方法的返回值为 true 时才会执行。因此,该方法将在整个请求结束之后,也就是在 DispatcherServlet 渲染了对应的视图之后执行,这个方法的主要作用是用于进行资源清理的工作。
创建登录拦截器 1 2 3 4 5 6 7 8 9 10 11 12 13 14 15 16 17 18 19 20 21 22 23 24 25 26 27 28 29 30 31 32 33 34 35 public class LoginInterceptor implements HandlerInterceptor @Override public boolean preHandle (HttpServletRequest httpServletRequest, HttpServletResponse httpServletResponse, Object o) throws Exception User user = (User)httpServletRequest.getSession().getAttribute(ConstantUtils.SESSION_USER); if (null == user) { httpServletResponse.sendRedirect("/login" ); return false ; } return true ; } @Override public void postHandle (HttpServletRequest httpServletRequest, HttpServletResponse httpServletResponse, Object o, ModelAndView modelAndView) throws Exception } @Override public void afterCompletion (HttpServletRequest httpServletRequest, HttpServletResponse httpServletResponse, Object o, Exception e) throws Exception }
登录拦截器,判断是否登录,如果未登录重定向到登录页面 ,否则放行
在 spring-mvc.xml 中配置拦截器 拦截器定义后还需要在 spring-mvc.xml 中配置拦截器,代码如下:
1 2 3 4 5 6 7 8 9 10 11 12 13 14 15 16 <mvc:interceptors > <mvc:interceptor > <mvc:mapping path ="/**" /> <mvc:exclude-mapping path ="/static/**" /> <mvc:exclude-mapping path ="/login" /> <bean class ="com.funtl.my.shop.web.interceptor.LoginInterceptor" /> </mvc:interceptor > <mvc:interceptor > <mvc:mapping path ="/**" /> <bean class ="com.funtl.my.shop.web.interceptor.PermissInterceptor" /> </mvc:interceptor > </mvc:interceptors >
说明:先执行权限检查拦截器,权限检查拦截所有请求,但是都放行,放行后执行postHandle,判断用户是否登录,如果登录,则/login请求重定向到首页
权限检查拦截器 1 2 3 4 5 6 7 8 9 10 11 12 13 14 15 16 17 18 19 20 21 22 23 public class PermissInterceptor implements HandlerInterceptor @Override public boolean preHandle (HttpServletRequest httpServletRequest, HttpServletResponse httpServletResponse, Object o) throws Exception return true ; } @Override public void postHandle (HttpServletRequest httpServletRequest, HttpServletResponse httpServletResponse, Object o, ModelAndView modelAndView) throws Exception if (modelAndView.getViewName().endsWith("login" )) { User user = (User) httpServletRequest.getSession().getAttribute(ConstantUtils.SESSION_USER); if (null != user) { httpServletResponse.sendRedirect("/main" ); } } } @Override public void afterCompletion (HttpServletRequest httpServletRequest, HttpServletResponse httpServletResponse, Object o, Exception e) throws Exception } }
Maven模块化开发 创建工程 创建一个名为 my-shop 的工程,pom.xml 文件如下:
1 2 3 4 5 6 7 8 9 10 11 12 13 14 15 <?xml version="1.0" encoding="UTF-8"?> <project xmlns ="http://maven.apache.org/POM/4.0.0" xmlns:xsi ="http://www.w3.org/2001/XMLSchema-instance" xsi:schemaLocation ="http://maven.apache.org/POM/4.0.0 http://maven.apache.org/xsd/maven-4.0.0.xsd" > <modelVersion > 4.0.0</modelVersion > <groupId > com.funtl</groupId > <artifactId > my-shop</artifactId > <version > 1.0.0-SNAPSHOT</version > <packaging > pom</packaging > <modules > </modules > </project >
该项目称之为 Root 项目,主要作用是管理整个工程的全部模块,当有新模块加入时需要在 modules 元素下配置对应的模块目录
注:打包方式为pom
创建统一的依赖管理 创建一个名为 my-shop-dependencies 的项目,pom.xml 文件如下:
1 2 3 4 5 6 7 8 9 10 11 12 13 14 15 16 17 18 19 20 21 22 23 24 25 26 27 28 29 30 31 32 33 34 35 36 37 38 39 40 41 42 43 44 45 46 47 48 49 50 51 52 53 54 55 56 57 58 59 60 61 62 63 64 65 66 67 68 69 70 71 72 73 74 75 76 77 78 79 80 81 82 83 84 85 86 87 88 89 90 91 92 93 94 95 96 97 98 99 100 101 102 103 104 105 106 107 108 109 110 111 112 113 114 115 116 117 118 119 120 121 122 123 124 125 126 127 128 129 130 <?xml version="1.0" encoding="UTF-8"?> <project xmlns ="http://maven.apache.org/POM/4.0.0" xmlns:xsi ="http://www.w3.org/2001/XMLSchema-instance" xsi:schemaLocation ="http://maven.apache.org/POM/4.0.0 http://maven.apache.org/xsd/maven-4.0.0.xsd" > <modelVersion > 4.0.0</modelVersion > <parent > <groupId > com.funtl</groupId > <artifactId > my-shop</artifactId > <version > 1.0.0-SNAPSHOT</version > <relativePath > ../pom.xml</relativePath > </parent > <artifactId > my-shop-dependencies</artifactId > <packaging > pom</packaging > <name > my-shop-dependencies</name > <description > </description > <properties > <project.build.sourceEncoding > UTF-8</project.build.sourceEncoding > <project.reporting.outputEncoding > UTF-8</project.reporting.outputEncoding > <java.version > 1.8</java.version > <commons-lang3.version > 3.5</commons-lang3.version > <jstl.version > 1.2</jstl.version > <log4j.version > 1.2.17</log4j.version > <servlet-api.version > 3.1.0</servlet-api.version > <slf4j.version > 1.7.25</slf4j.version > <spring.version > 4.3.17.RELEASE</spring.version > </properties > <dependencyManagement > <dependencies > <dependency > <groupId > org.springframework</groupId > <artifactId > spring-context</artifactId > <version > ${spring.version}</version > </dependency > <dependency > <groupId > org.springframework</groupId > <artifactId > spring-webmvc</artifactId > <version > ${spring.version}</version > </dependency > <dependency > <groupId > javax.servlet</groupId > <artifactId > javax.servlet-api</artifactId > <version > ${servlet-api.version}</version > <scope > provided</scope > </dependency > <dependency > <groupId > javax.servlet</groupId > <artifactId > jstl</artifactId > <version > ${jstl.version}</version > </dependency > <dependency > <groupId > org.slf4j</groupId > <artifactId > slf4j-api</artifactId > <version > ${slf4j.version}</version > </dependency > <dependency > <groupId > org.slf4j</groupId > <artifactId > slf4j-log4j12</artifactId > <version > ${slf4j.version}</version > </dependency > <dependency > <groupId > org.slf4j</groupId > <artifactId > jcl-over-slf4j</artifactId > <version > ${slf4j.version}</version > </dependency > <dependency > <groupId > org.slf4j</groupId > <artifactId > jul-to-slf4j</artifactId > <version > ${slf4j.version}</version > </dependency > <dependency > <groupId > log4j</groupId > <artifactId > log4j</artifactId > <version > ${log4j.version}</version > </dependency > <dependency > <groupId > org.apache.commons</groupId > <artifactId > commons-lang3</artifactId > <version > ${commons-lang3.version}</version > </dependency > </dependencies > </dependencyManagement > <build > <plugins > <plugin > <groupId > org.apache.maven.plugins</groupId > <artifactId > maven-compiler-plugin</artifactId > <version > 3.7.0</version > <configuration > <source > ${java.version}</source > <target > ${java.version}</target > <encoding > ${project.build.sourceEncoding}</encoding > <showWarnings > true</showWarnings > </configuration > </plugin > </plugins > <resources > <resource > <directory > src/main/java</directory > <excludes > <exclude > **/*.java</exclude > </excludes > </resource > <resource > <directory > src/main/resources</directory > </resource > </resources > </build > </project >
PS:别忘记在 my-shop 工程的pom.xml 中增加<module>my-shop-dependencies</module> 配置
注:该项目只是为了管理依赖
创建通用的工具类(将工具类单独作为一个项目) 创建一个名为my-shop-commons 的项目,pom.xml文件如下:
1 2 3 4 5 6 7 8 9 10 11 12 13 14 15 16 17 18 19 <?xml version="1.0" encoding="UTF-8"?> <project xmlns ="http://maven.apache.org/POM/4.0.0" xmlns:xsi ="http://www.w3.org/2001/XMLSchema-instance" xsi:schemaLocation ="http://maven.apache.org/POM/4.0.0 http://maven.apache.org/xsd/maven-4.0.0.xsd" > <modelVersion > 4.0.0</modelVersion > <parent > <groupId > com.funtl</groupId > <artifactId > my-shop-dependencies</artifactId > <version > 1.0.0-SNAPSHOT</version > <relativePath > ../my-shop-dependencies/pom.xml</relativePath > </parent > <artifactId > my-shop-commons</artifactId > <packaging > jar</packaging > <name > my-shop-commons</name > <description > </description > </project >
PS:别忘记在my-shop 工程的pom.xml 中增加 <module>my-shop-commons</module> 配置
注:父项目为依赖管理项目,目的就是为了统一管理依赖版本。
创建领域模型 创建一个名为 my-shop-domain 的项目,pom.xml 文件如下:
1 2 3 4 5 6 7 8 9 10 11 12 13 14 15 16 17 18 19 <?xml version="1.0" encoding="UTF-8"?> <project xmlns ="http://maven.apache.org/POM/4.0.0" xmlns:xsi ="http://www.w3.org/2001/XMLSchema-instance" xsi:schemaLocation ="http://maven.apache.org/POM/4.0.0 http://maven.apache.org/xsd/maven-4.0.0.xsd" > <modelVersion > 4.0.0</modelVersion > <parent > <groupId > com.funtl</groupId > <artifactId > my-shop-dependencies</artifactId > <version > 1.0.0-SNAPSHOT</version > <relativePath > ../my-shop-dependencies/pom.xml</relativePath > </parent > <artifactId > my-shop-domain</artifactId > <packaging > jar</packaging > <name > my-shop-domain</name > <description > </description > </project >
PS:别忘记在 my-shop 工程的 pom.xml 中增加 my-shop-domain 配置
创建管理后台 创建一个名为 my-shop-web-admin 的项目,pom.xml 文件如下:
1 2 3 4 5 6 7 8 9 10 11 12 13 14 15 16 17 18 19 20 21 22 23 24 25 26 27 28 29 30 31 32 <?xml version="1.0" encoding="UTF-8"?> <project xmlns ="http://maven.apache.org/POM/4.0.0" xmlns:xsi ="http://www.w3.org/2001/XMLSchema-instance" xsi:schemaLocation ="http://maven.apache.org/POM/4.0.0 http://maven.apache.org/xsd/maven-4.0.0.xsd" > <modelVersion > 4.0.0</modelVersion > <parent > <groupId > com.funtl</groupId > <artifactId > my-shop-dependencies</artifactId > <version > 1.0.0-SNAPSHOT</version > <relativePath > ../my-shop-dependencies/pom.xml</relativePath > </parent > <artifactId > my-shop-web-admin</artifactId > <packaging > war</packaging > <name > my-shop-web-admin</name > <description > </description > <dependencies > <dependency > <groupId > com.funtl</groupId > <artifactId > my-shop-commons</artifactId > <version > ${project.parent.version}</version > </dependency > <dependency > <groupId > com.funtl</groupId > <artifactId > my-shop-domain</artifactId > <version > ${project.parent.version}</version > </dependency > </dependencies > </project >
PS:别忘记在 my-shop 工程的 pom.xml 中增加 my-shop-web-admin 配置
注:后台管理依赖领域模型和工具类项目
创建商城前端 创建一个名为 my-shop-web-ui 的项目,pom.xml 文件如下:
1 2 3 4 5 6 7 8 9 10 11 12 13 14 15 16 17 18 19 20 21 22 23 24 25 26 27 <?xml version="1.0" encoding="UTF-8"?> <project xmlns ="http://maven.apache.org/POM/4.0.0" xmlns:xsi ="http://www.w3.org/2001/XMLSchema-instance" xsi:schemaLocation ="http://maven.apache.org/POM/4.0.0 http://maven.apache.org/xsd/maven-4.0.0.xsd" > <modelVersion > 4.0.0</modelVersion > <parent > <groupId > com.funtl</groupId > <artifactId > my-shop-dependencies</artifactId > <version > 1.0.0-SNAPSHOT</version > <relativePath > ../my-shop-dependencies/pom.xml</relativePath > </parent > <artifactId > my-shop-web-ui</artifactId > <packaging > war</packaging > <name > my-shop-web-ui</name > <description > </description > <dependencies > <dependency > <groupId > com.funtl</groupId > <artifactId > my-shop-commons</artifactId > <version > ${project.parent.version}</version > </dependency > </dependencies > </project >
创建接口模块 创建一个名为 my-shop-web-api 的项目,pom.xml 文件如下:
1 2 3 4 5 6 7 8 9 10 11 12 13 14 15 16 17 18 19 20 21 22 23 24 25 26 27 <?xml version="1.0" encoding="UTF-8"?> <project xmlns ="http://maven.apache.org/POM/4.0.0" xmlns:xsi ="http://www.w3.org/2001/XMLSchema-instance" xsi:schemaLocation ="http://maven.apache.org/POM/4.0.0 http://maven.apache.org/xsd/maven-4.0.0.xsd" > <modelVersion > 4.0.0</modelVersion > <parent > <groupId > com.funtl</groupId > <artifactId > my-shop-dependencies</artifactId > <version > 1.0.0-SNAPSHOT</version > <relativePath > ../my-shop-dependencies/pom.xml</relativePath > </parent > <artifactId > my-shop-web-api</artifactId > <packaging > war</packaging > <name > my-shop-web-api</name > <description > </description > <dependencies > <dependency > <groupId > com.funtl</groupId > <artifactId > my-shop-commons</artifactId > <version > ${project.parent.version}</version > </dependency > </dependencies > </project >
PS:别忘记在 my-shop 工程的 pom.xml 中增加 my-shop-web-api 配置
根项目的pom.xml 1 2 3 4 5 6 7 8 9 10 11 12 13 14 15 16 17 18 19 20 <?xml version="1.0" encoding="UTF-8"?> <project xmlns ="http://maven.apache.org/POM/4.0.0" xmlns:xsi ="http://www.w3.org/2001/XMLSchema-instance" xsi:schemaLocation ="http://maven.apache.org/POM/4.0.0 http://maven.apache.org/xsd/maven-4.0.0.xsd" > <modelVersion > 4.0.0</modelVersion > <groupId > com.funtl</groupId > <artifactId > my-shop</artifactId > <version > 1.0.0-SNAPSHOT</version > <packaging > pom</packaging > <modules > <module > my-shop-dependencies</module > <module > my-shop-commons</module > <module > my-shop-domain</module > <module > my-shop-web-admin</module > <module > my-shop-web-ui</module > <module > my-shop-web-api</module > </modules > </project >
自定义封装返回信息类 1 2 3 4 5 6 7 8 9 10 11 12 13 14 15 16 17 18 19 20 21 22 23 24 25 26 27 28 29 30 31 32 33 34 35 36 37 38 39 40 41 42 43 44 45 46 47 48 49 50 51 52 53 54 55 56 57 58 59 60 61 62 63 64 65 66 67 68 69 70 71 72 73 74 75 76 77 78 79 80 81 82 83 84 85 86 87 88 89 90 91 92 93 94 95 96 97 98 99 100 101 102 103 104 105 package com.funtl.my.shop.commons.dto;import java.io.Serializable;public class BaseResult implements Serializable private static final int SUCCESS_STATUS = 200 ; private static final int SUCCESS_FAIL = 500 ; private int status; private String message; public static BaseResult success () return BaseResult.createResult(SUCCESS_STATUS, "成功" ); } public static BaseResult fail () return BaseResult.createResult(SUCCESS_FAIL, "失败" ); } public static BaseResult success (String message) return BaseResult.createResult(SUCCESS_STATUS, message); } public static BaseResult fail (String message) return BaseResult.createResult(SUCCESS_FAIL, message); } public static BaseResult fail (int status, String message) return BaseResult.createResult(status, message); } public int getStatus () return status; } public void setStatus (int status) this .status = status; } public String getMessage () return message; } public void setMessage (String message) this .message = message; } private static BaseResult createResult (int status, String message) BaseResult baseResult = new BaseResult(); baseResult.setStatus(status); baseResult.setMessage(message); return baseResult; } }
请求转发和重定向 1 2 3 4 5 6 7 8 9 <%@ page contentType="text/html;charset=UTF-8" language="java" %> <!DOCTYPE html > <html > <head > <meta http-equiv ="refresh" content ="1; url=/login" /> </head > </html >
处理get请求,得到cookie,并且进行请求转发 1 2 3 4 5 6 7 8 9 10 11 12 protected void doGet (HttpServletRequest req, HttpServletResponse resp) throws ServletException, IOException String userInfo = CookieUtils.getCookieValue(req,COOKIE_NAME_USER_INFO); System.out.println("hello" ); if (StringUtils.isNotEmpty(userInfo) && null != userInfo) { String [] cookie = userInfo.split(":" ); req.setAttribute("email" , cookie[0 ]); req.setAttribute("password" , cookie[1 ]); req.setAttribute("isRemember" , true ); } req.getRequestDispatcher("/login.jsp" ).forward(req,resp); }
处理登录请求(post) 1 2 3 4 5 6 7 8 9 10 11 12 13 14 15 16 17 18 19 20 21 protected void doPost(HttpServletRequest req, HttpServletResponse resp) throws ServletException, IOException { String email = req.getParameter("email"); String password = req.getParameter("password"); boolean isRemember = req.getParameter("isRemember") == null ? false: true; User admin = userService.login(email, password); // if (null != admin) { if (isRemember) { //用户信息存储一周 CookieUtils.setCookie(req,resp,COOKIE_NAME_USER_INFO, String.format("%s:%S", email, password),7*24*60*60); } resp.sendRedirect("/main.jsp"); } else { req.setAttribute("message","账号或者密码错误"); req.getRequestDispatcher("/login.jsp").forward(req, resp); } }
请求转发和请求重定向的区别 组件之间可否共享信息不同(本质区别) 当客户端向服务器发送请求时,服务器收到请求后,会将请求封装成一个HttpServletRequest对象request,并且所有的请求参数都封装在request对象中,这个对象时Jsp的内置对象可以直接在Jsp中使用。服务器收到请求后,还需要请求别的页面,这是就有两种方式:请求转发和请求重定向。
所谓请求转发,是服务器的行为,请求由服务器转发给另外一个页面处理,如何转发,何时转发,转发几次,客户端是不知道的。请求转发时,从发送第一次到最后一次请求的过程中,web容器只创建一次request和response对象,新的页面继续处理同一个请求。也可以理解为服务器将request对象在页面之间传递。
所谓请求重定向,是客户端的行为,每次请求重定向都是由客户端发起的,也就是说重定向一次,就刷新request对象的属性,之前的request对象的属性值就失效了。
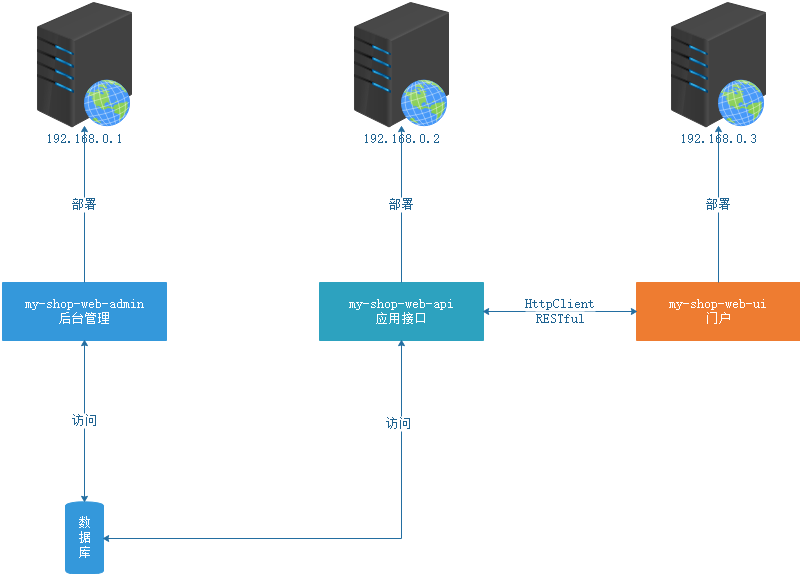
模块间通信问题 Apache HttpClient 简易架构图
Apache HttpClient 简介
HttpClient 是 Apache Jakarta Common 下的子项目,用来提供高效的、最新的、功能丰富的支持 HTTP 协议的客户端编程工具包,并且它支持 HTTP 协议最新的版本和建议。HttpClient 已经应用在很多的项目中,比如 Apache Jakarta 上很著名的另外两个开源项目 Cactus 和 HTMLUnit 都使用了 HttpClient。
HttpClient 相比传统 JDK 自带的 URLConnection,增加了易用性和灵活性,它不仅是客户端发送 HTTP 请求变得容易,而且也方便了开发人员测试接口(基于 HTTP 协议的),即提高了开发的效率,也方便提高代码的健壮性。因此熟练掌握 HttpClient 是很重要的必修内容,掌握 HttpClient 后,相信对于 HTTP 协议的了解会更加深入。
Apache HttpClient 特性
基于标准、纯净的 Java 语言。实现了 HTTP 1.0 和 HTTP 1.1
以可扩展的面向对象的结构实现了 HTTP 全部的方法(GET, POST, PUT, DELETE, HEAD, OPTIONS, and TRACE)。
支持 HTTPS 协议。
通过 HTTP 代理建立透明的连接。
利用 CONNECT 方法通过 HTTP 代理建立隧道的 HTTPS 连接。
Basic, Digest, NTLMv1, NTLMv2, NTLM2 Session, SNPNEGO/Kerberos 认证方案。
插件式的自定义认证方案。
便携可靠的套接字工厂使它更容易的使用第三方解决方案。
连接管理器支持多线程应用。支持设置最大连接数,同时支持设置每个主机的最大连接数,发现并关闭过期的连接。
自动处理 Set-Cookie 中的 Cookie。
插件式的自定义 Cookie 策略。
Request 的输出流可以避免流中内容直接缓冲到 Socket 服务器。
Response 的输入流可以有效的从 Socket 服务器直接读取相应内容。
在 HTTP 1.0 和 HTTP 1.1 中利用 KeepAlive 保持持久连接。
直接获取服务器发送的 response code 和 headers。
设置连接超时的能力。
实验性的支持 HTTP 1.1 response caching。
源代码基于 Apache License 可免费获取
Apache HttpClient 使用流程 使用 HttpClient 发送请求、接收响应很简单,一般需要如下几步即可。
创建 HttpClient 对象。
创建请求方法的实例,并指定请求 URL。如果需要发送 GET 请求,创建 HttpGet 对象;如果需要发送 POST 请求,创建 HttpPost 对象。
如果需要发送请求参数,可调用 HttpGet、HttpPost 共同的 setParams(HttpParams params) 方法来添加请求参数;对于 HttpPost 对象而言,也可调用 setEntity(HttpEntity entity) 方法来设置请求参数。
调用 HttpClient 对象的 execute(HttpUriRequest request) 发送请求,该方法返回一个 HttpResponse。
调用 HttpResponse 的 getAllHeaders()、getHeaders(String name) 等方法可获取服务器的响应头;调用 HttpResponse 的 getEntity() 方法可获取 HttpEntity 对象,该对象包装了服务器的响应内容。程序可通过该对象获取服务器的响应内容。
释放连接。无论执行方法是否成功,都必须释放连接
Apache HttpClient 使用实例 POM pom.xml 配置如下:
1 2 3 4 5 6 7 8 9 10 11 12 13 14 15 16 17 <dependency > <groupId > org.apache.httpcomponents</groupId > <artifactId > httpclient</artifactId > <version > 4.5.5</version > </dependency > <dependency > <groupId > org.apache.httpcomponents</groupId > <artifactId > fluent-hc</artifactId > <version > 4.5.5</version > </dependency > <dependency > <groupId > org.apache.httpcomponents</groupId > <artifactId > httpmime</artifactId > <version > 4.5.5</version > </dependency >
主要增加了 org.apache.httpcomponents:httpclient、org.apache.httpcomponents:fluent-hc、org.apache.httpcomponents:httpmime 三个依赖
创建 HttpGet 请求 案例代码如下:
1 2 3 4 5 6 7 8 9 10 11 12 13 14 15 16 17 18 19 20 21 22 23 24 25 26 27 28 29 30 31 32 33 34 35 36 37 38 39 40 41 42 43 44 45 46 47 48 49 50 51 52 53 54 55 56 57 58 59 60 package com.funtl.hello.httpclient;import org.apache.http.HttpEntity;import org.apache.http.client.methods.CloseableHttpResponse;import org.apache.http.client.methods.HttpGet;import org.apache.http.impl.client.CloseableHttpClient;import org.apache.http.impl.client.HttpClients;import org.apache.http.util.EntityUtils;import java.io.IOException;public class MyTest public static void main (String[] args) get(); } private static void get () CloseableHttpClient httpClient = HttpClients.createDefault(); HttpGet httpGet = new HttpGet("http://localhost:8080/content/page?draw=1&start=0&length=10" ); httpGet.setHeader("Connection" , "keep-alive" ); httpGet.setHeader("User-Agent" , "Mozilla/5.0 (Windows NT 10.0; WOW64) AppleWebKit/537.36 (KHTML, like Gecko) Chrome/63.0.3239.132 Safari/537.36" ); httpGet.setHeader("Cookie" , "UM_distinctid=16442706a09352-0376059833914f-3c604504-1fa400-16442706a0b345; CNZZDATA1262458286=1603637673-1530123020-%7C1530123020; JSESSIONID=805587506F1594AE02DC45845A7216A4" ); CloseableHttpResponse httpResponse = null ; try { httpResponse = httpClient.execute(httpGet); HttpEntity httpEntity = httpResponse.getEntity(); System.out.println(EntityUtils.toString(httpEntity)); } catch (IOException e) { e.printStackTrace(); } finally { if (httpResponse != null ) { try { httpResponse.close(); } catch (IOException e) { e.printStackTrace(); } } if (httpClient != null ) { try { httpClient.close(); } catch (IOException e) { e.printStackTrace(); } } } } }
控制台输出结果:
1 {"draw" :1 ,"recordsTotal" :1 ,"recordsFiltered" :1 ,"data" :[{"id" :33 ,"created" :1530542074000 ,"updated" :1530542074000 ,"title" :"ad1" ,"subTitle" :"ad1" ,"titleDesc" :"ad1" ,"url" :"https://sale.jd.com/act/XkCzhoisOMSW.html" ,"pic" :"https://m.360buyimg.com/babel/jfs/t20164/187/1771326168/92964/b42fade7/5b359ab2N93be3a65.jpg" ,"pic2" :"" ,"content" :"<p><br></p>" ,"tbContentCategory" :{"id" :89 ,"created" :null ,"updated" :null ,"parent" :null ,"isParent" :null ,"name" :"幻灯片" ,"status" :null ,"sortOrder" :null }}],"error" :null }
创建 HttpPost 请求 案例代码如下:
1 2 3 4 5 6 7 8 9 10 11 12 13 14 15 16 17 18 19 20 21 22 23 24 25 26 27 28 29 30 31 32 33 34 35 36 37 38 39 40 41 42 43 44 45 46 47 48 49 50 51 52 53 54 55 56 57 58 59 60 61 62 63 64 65 66 67 68 69 70 71 72 73 74 75 76 77 package com.funtl.hello.httpclient;import org.apache.http.HttpEntity;import org.apache.http.client.ClientProtocolException;import org.apache.http.client.entity.UrlEncodedFormEntity;import org.apache.http.client.methods.CloseableHttpResponse;import org.apache.http.client.methods.HttpPost;import org.apache.http.impl.client.CloseableHttpClient;import org.apache.http.impl.client.HttpClients;import org.apache.http.message.BasicNameValuePair;import org.apache.http.util.EntityUtils;import java.io.IOException;import java.io.UnsupportedEncodingException;import java.util.ArrayList;import java.util.List;public class MyTest public static void main (String[] args) post(); } private static void post () CloseableHttpClient httpClient = HttpClients.createDefault(); HttpPost httpPost = new HttpPost("http://localhost:8080/content/page" ); httpPost.setHeader("Connection" , "keep-alive" ); httpPost.setHeader("User-Agent" , "Mozilla/5.0 (Windows NT 10.0; WOW64) AppleWebKit/537.36 (KHTML, like Gecko) Chrome/63.0.3239.132 Safari/537.36" ); httpPost.setHeader("Cookie" , "UM_distinctid=16442706a09352-0376059833914f-3c604504-1fa400-16442706a0b345; CNZZDATA1262458286=1603637673-1530123020-%7C1530123020; JSESSIONID=805587506F1594AE02DC45845A7216A4" ); List<BasicNameValuePair> params = new ArrayList<BasicNameValuePair>(); params.add(new BasicNameValuePair("draw" , "1" )); params.add(new BasicNameValuePair("start" , "0" )); params.add(new BasicNameValuePair("length" , "10" )); CloseableHttpResponse httpResponse = null ; try { httpPost.setEntity(new UrlEncodedFormEntity(params, "UTF-8" )); httpResponse = httpClient.execute(httpPost); HttpEntity httpEntity = httpResponse.getEntity(); System.out.println(EntityUtils.toString(httpEntity)); } catch (UnsupportedEncodingException e) { e.printStackTrace(); } catch (ClientProtocolException e) { e.printStackTrace(); } catch (IOException e) { e.printStackTrace(); } finally { try { if (httpResponse != null ) { httpResponse.close(); } } catch (IOException e) { e.printStackTrace(); } try { if (httpClient != null ) { httpClient.close(); } } catch (IOException e) { e.printStackTrace(); } } } }
控制台输出结果:
1 {"draw" :1 ,"recordsTotal" :1 ,"recordsFiltered" :1 ,"data" :[{"id" :33 ,"created" :1530542074000 ,"updated" :15305
Jackson Jackson 简介 Jackson 是一个简单基于 Java 应用库,Jackson 可以轻松的将 Java 对象转换成 json 对象和 xml 文档,同样也可以将 json、xml 转换成 Java 对象。Jackson 所依赖的 jar 包较少,简单易用并且性能也要相对高些,并且 Jackson 社区相对比较活跃,更新速度也比较快。
Jackson 特点
容易使用 - jackson API 提供了一个高层次外观,以简化常用的用例。
无需创建映射 - API提供了默认的映射大部分对象序列化。
性能高 - 快速,低内存占用,适合大型对象图表或系统。
干净的 JSON - jackson 创建一个干净和紧凑的 JSON 结果,这是让人很容易阅读。
不依赖 - 库不需要任何其他的库,除了 JDK。
开源代码 - jackson 是开源的,可以免费使用。
Jackson 注解 Jackson 类库包含了很多注解,可以让我们快速建立 Java 类与 JSON 之间的关系。
@JsonProperty@JsonProperty 注解指定一个属性用于 JSON 映射,默认情况下映射的 JSON 属性与注解的属性名称相同,不过可以使用该注解的 value 值修改 JSON 属性名,该注解还有一个 index 属性指定生成 JSON 属性的顺序,如果有必要的话。
@JsonIgnore@JsonIgnore 注解用于排除某个属性,这样该属性就不会被 Jackson 序列化和反序列化。
@JsonIgnoreProperties@JsonIgnoreProperties 注解是类注解。在序列化为 JSON 的时候,@JsonIgnoreProperties({"prop1", "prop2"}) 会忽略 pro1 和 pro2 两个属性。在从 JSON 反序列化为 Java 类的时候,@JsonIgnoreProperties(ignoreUnknown=true) 会忽略所有没有 Getter 和 Setter 的属性。该注解在 Java 类和 JSON 不完全匹配的时候很有用。
@JsonIgnoreType@JsonIgnoreType 也是类注解,会排除所有指定类型的属性。
@JsonPropertyOrder@JsonPropertyOrder 和 @JsonProperty 的 index 属性类似,指定属性序列化时的顺序。
@JsonRootName@JsonRootName 注解用于指定 JSON 根属性的名称。
Jackson 使用实例 对象的序列化与反序列化 1 2 3 4 5 6 7 8 9 10 11 12 13 14 15 16 17 18 19 20 21 22 23 24 25 26 27 28 29 30 31 32 33 34 35 36 37 38 39 40 41 42 43 44 45 46 47 48 49 50 51 52 53 54 55 56 57 58 59 package com.funtl.hello.httpclient;import com.fasterxml.jackson.core.JsonParseException;import com.fasterxml.jackson.databind.JsonMappingException;import com.fasterxml.jackson.databind.ObjectMapper;import java.io.IOException;public class JsonTester public static void main (String[] args) ObjectMapper mapper = new ObjectMapper(); String jsonString = "{\"name\":\"Mahesh\", \"age\":21}" ; try { Student student = mapper.readValue(jsonString, Student.class); System.out.println(student); String json = mapper.writeValueAsString(student); System.out.println(json); } catch (JsonParseException e) { e.printStackTrace(); } catch (JsonMappingException e) { e.printStackTrace(); } catch (IOException e) { e.printStackTrace(); } } } class Student private String name; private int age; public Student () } public String getName () return name; } public void setName (String name) this .name = name; } public int getAge () return age; } public void setAge (int age) this .age = age; } public String toString () return "Student [ name: " + name + ", age: " + age + " ]" ; } }
集合的序列化与反序列化 1 2 3 4 5 6 7 8 9 10 11 12 13 14 15 16 17 18 19 20 21 22 23 24 25 26 27 28 29 30 31 32 33 34 35 36 37 38 39 40 41 42 43 44 45 46 47 48 49 50 51 52 53 54 55 56 57 58 59 60 61 62 63 64 65 66 67 68 69 70 71 72 73 74 75 76 77 78 79 80 81 82 83 84 85 86 87 88 89 90 91 92 93 94 95 96 97 98 99 100 101 102 103 104 105 106 107 108 109 110 111 112 113 114 115 116 117 118 119 120 121 122 123 124 125 126 127 128 package com.funtl.hello.httpclient;import com.fasterxml.jackson.databind.JavaType;import com.fasterxml.jackson.databind.JsonNode;import com.fasterxml.jackson.databind.ObjectMapper;import java.io.IOException;import java.util.ArrayList;import java.util.List;public class JsonTester public static void main (String[] args) ObjectMapper mapper = new ObjectMapper(); String jsonString = "{\"draw\":1,\"recordsTotal\":1,\"recordsFiltered\":1,\"data\":[{\"id\":33,\"title\":\"ad1\",\"subTitle\":\"ad1\",\"titleDesc\":\"ad1\",\"url\":\"https://sale.jd.com/act/XkCzhoisOMSW.html\",\"pic\":\"https://m.360buyimg.com/babel/jfs/t20164/187/1771326168/92964/b42fade7/5b359ab2N93be3a65.jpg\",\"pic2\":\"\",\"content\":\"<p><br></p>\"}],\"error\":null}" ; try { JsonNode jsonNode = mapper.readTree(jsonString); JsonNode jsonData = jsonNode.findPath("data" ); System.out.println(jsonData); JavaType javaType = mapper.getTypeFactory().constructParametricType(ArrayList.class, TbContent.class); List<TbContent> tbContents = mapper.readValue(jsonData.toString(), javaType); for (TbContent tbContent : tbContents) { System.out.println(tbContent); } String json = mapper.writeValueAsString(tbContents); System.out.println(json); } catch (IOException e) { e.printStackTrace(); } } } class TbContent private Long id; private String title; private String subTitle; private String titleDesc; private String url; private String pic; private String pic2; private String content; public Long getId () return id; } public void setId (Long id) this .id = id; } public String getTitle () return title; } public void setTitle (String title) this .title = title; } public String getSubTitle () return subTitle; } public void setSubTitle (String subTitle) this .subTitle = subTitle; } public String getTitleDesc () return titleDesc; } public void setTitleDesc (String titleDesc) this .titleDesc = titleDesc; } public String getUrl () return url; } public void setUrl (String url) this .url = url; } public String getPic () return pic; } public void setPic (String pic) this .pic = pic; } public String getPic2 () return pic2; } public void setPic2 (String pic2) this .pic2 = pic2; } public String getContent () return content; } public void setContent (String content) this .content = content; } @Override public String toString () return "TbContent{" + "id=" + id + ", title='" + title + '\'' + ", subTitle='" + subTitle + '\'' + ", titleDesc='" + titleDesc + '\'' + ", url='" + url + '\'' + ", pic='" + pic + '\'' + ", pic2='" + pic2 + '\'' + ", content='" + content + '\'' + '}' ; } }
各种对象的理解
你怎么理解 RESTful 概述 2000 年,Roy Thomas Fielding 博士在他那篇著名的博士论文《Architectural Styles and the Design of Network-based Software Architectures》中提出了几种软件应用的架构风格,REST 作为其中的一种架构风格在这篇论文的第5章中进行了概括性的介绍。
REST 是“REpresentational State Transfer”的缩写,可以翻译成“表现状态转换”,但是在绝大多数场合中我们只说 REST 或者 RESTful。Fielding 在论文中将 REST 定位为“分布式超媒体应用(Distributed Hypermedia System)”的架构风格,它在文中提到一个名为“HATEOAS(Hypermedia as the engine of application state)”的概念。
我们利用一个面向最终用户的 Web 应用来对这个概念进行简单阐述:这里所谓的应用状态(Application State)表示 Web 应用的客户端的状态,简单起见可以理解为会话状态。资源在浏览器中以超媒体的形式呈现,通过点击超媒体中的链接可以获取其它相关的资源或者对当前资源进行相应的处理,获取的资源或者针对资源处理的响应同样以超媒体的形式再次呈现在浏览器上。由此可见,超媒体成为了驱动客户端会话状态的转换的引擎。
借助于超媒体这种特殊的资源呈现方式,应用状态的转换体现为浏览器中呈现资源的转换。如果将超媒体进一步抽象成一般意义上的资源呈现(Representation )方式,那么应用状态变成了可被呈现的状态(REpresentational State)。应用状态之间的转换就成了可被呈现的状态装换(REpresentational State Transfer),这就是 REST。
REST 是一种很笼统的概念,它代表一种架构风格
版本号 在 RESTful API 中,API 接口应该尽量兼容之前的版本。但是,在实际业务开发场景中,可能随着业务需求的不断迭代,现有的 API 接口无法支持旧版本的适配,此时如果强制升级服务端的 API 接口将导致客户端旧有功能出现故障。实际上,Web 端是部署在服务器,因此它可以很容易为了适配服务端的新的 API 接口进行版本升级,然而像 Android 端、IOS 端、PC 端等其他客户端是运行在用户的机器上,因此当前产品很难做到适配新的服务端的 API 接口,从而出现功能故障,这种情况下,用户必须升级产品到最新的版本才能正常使用。
为了解决这个版本不兼容问题,在设计 RESTful API 的一种实用的做法是使用版本号。一般情况下,我们会在 url 中保留版本号,并同时兼容多个版本。
1 2 【GET】 /v1/users/{user_id} // 版本 v1 的查询用户列表的 API 接口 【GET】 /v2/users/{user_id} // 版本 v2 的查询用户列表的 API 接口
现在,我们可以不改变版本 v1 的查询用户列表的 API 接口的情况下,新增版本 v2 的查询用户列表的 API 接口以满足新的业务需求,此时,客户端的产品的新功能将请求新的服务端的 API 接口地址。虽然服务端会同时兼容多个版本,但是同时维护太多版本对于服务端而言是个不小的负担,因为服务端要维护多套代码。这种情况下,常见的做法不是维护所有的兼容版本,而是只维护最新的几个兼容版本,例如维护最新的三个兼容版本。在一段时间后,当绝大多数用户升级到较新的版本后,废弃一些使用量较少的服务端的老版本API 接口版本,并要求使用产品的非常旧的版本的用户强制升级。
注意的是,“不改变版本 v1 的查询用户列表的 API 接口”主要指的是对于客户端的调用者而言它看起来是没有改变。而实际上,如果业务变化太大,服务端的开发人员需要对旧版本的 API 接口使用适配器模式将请求适配到新的API 接口上。
资源路径 RESTful API 的设计以资源为核心,每一个 URI 代表一种资源。因此,URI 不能包含动词,只能是名词。注意的是,形容词也是可以使用的,但是尽量少用。一般来说,不论资源是单个还是多个,API 的名词要以复数进行命名。此外,命名名词的时候,要使用小写、数字及下划线来区分多个单词。这样的设计是为了与 json 对象及属性的命名方案保持一致。例如,一个查询系统标签的接口可以进行如下设计。
1
同时,资源的路径应该从根到子依次如下
1 /{resources}/{resource_id}/{sub_resources}/{sub_resource_id}/{sub_resource_property}
1
我们来看一个“添加用户的角色”的设计,其中“用户”是主资源,“角色”是子资源。
1 【POST】 /v1/users/{user_id}/roles/{role_id} // 添加用户的角色
1
有的时候,当一个资源变化难以使用标准的 RESTful API 来命名,可以考虑使用一些特殊的 actions 命名。
1 /{resources}/{resource_id}/actions/{action}
1
举个例子,“密码修改”这个接口的命名很难完全使用名词来构建路径,此时可以引入 action 命名。
1 【PUT】 /v1/users/{user_id}/password/actions/modify // 密码修改
请求方式 可以通过 GET、 POST、 PUT、 PATCH、 DELETE 等方式对服务端的资源进行操作。其中:
GET:用于查询资源
POST:用于创建资源
PUT:用于更新服务端的资源的全部信息
PATCH:用于更新服务端的资源的部分信息
DELETE:用于删除服务端的资源。
这里,使用“用户”的案例进行回顾通过 GET、 POST、 PUT、 PATCH、 DELETE 等方式对服务端的资源进行操作。
1 2 3 4 5 6 【GET】 /users # 查询用户信息列表 【GET】 /users/1001 # 查看某个用户信息 【POST】 /users # 新建用户信息 【PUT】 /users/1001 # 更新用户信息(全部字段) 【PATCH】 /users/1001 # 更新用户信息(部分字段) 【DELETE】 /users/1001 # 删除用户信息
查询参数 RESTful API 接口应该提供参数,过滤返回结果。其中,offset 指定返回记录的开始位置。一般情况下,它会结合 limit 来做分页的查询,这里 limit 指定返回记录的数量。
1 【GET】 /{version}/{resources}/{resource_id}?offset=0&limit=20
1
同时,orderby 可以用来排序,但仅支持单个字符的排序,如果存在多个字段排序,需要业务中扩展其他参数进行支持。
1 【GET】 /{version}/{resources}/{resource_id}?orderby={field} [asc|desc]
1
为了更好地选择是否支持查询总数,我们可以使用 count 字段,count 表示返回数据是否包含总条数,它的默认值为 false。
1 【GET】 /{version}/{resources}/{resource_id}?count=[true|false]
1
上面介绍的 offset、 limit、 orderby 是一些公共参数。此外,业务场景中还存在许多个性化的参数。我们来看一个例子。
1 【GET】 /v1/categorys/{category_id}/apps/{app_id}?enable=[1|0]&os_type={field}&device_ids={field,field,…}
1
注意的是,不要过度设计,只返回用户需要的查询参数。此外,需要考虑是否对查询参数创建数据库索引以提高查询性能
状态码 使用适合的状态码很重要,而不应该全部都返回状态码 200,或者随便乱使用。这里,列举在实际开发过程中常用的一些状态码,以供参考。
状态码
描述
200
请求成功
201
创建成功
400
错误的请求
401
未验证
403
被拒绝
404
无法找到
409
资源冲突
500
服务器内部错误
异常响应 当 RESTful API 接口出现非 2xx 的 HTTP 错误码响应时,采用全局的异常结构响应信息。
1 2 3 4 5 6 7 8 9 10 HTTP/1.1 400 Bad RequestContent-Type : application/json{ "code": "INVALID_ARGUMENT", "message": "{error message}", "cause": "{cause message}", "request_id": "01234567-89ab-cdef-0123-456789abcdef", "host_id": "{server identity}", "server_time": "2014-01-01T12:00:00Z" }
请求参数 在设计服务端的 RESTful API 的时候,我们还需要对请求参数进行限制说明。例如一个支持批量查询的接口,我们要考虑最大支持查询的数量。
1 2 3 【GET】 /v1/users/batch?user_ids=1001,1002 // 批量查询用户信息 参数说明 - user_ids: 用户ID串,最多允许 20 个。
此外,在设计新增或修改接口时,我们还需要在文档中明确告诉调用者哪些参数是必填项,哪些是选填项,以及它们的边界值的限制。
1 2 3 4 5 6 7 8 9 10 【POST】 /v1/users 请求内容 { "username" : "lusifer" , "realname" : "鲁斯菲尔" , "password" : "123456" , "email" : "topsale@vip.qq.com" , "weixin" : "Lusifer" , "sex" : 1 }
响应参数 针对不同操作,服务端向用户返回的结果应该符合以下规范。
1 2 3 4 5 6 7 【GET】 /{version}/{resources}/{resource_id} // 返回单个资源对象 【GET】 /{version}/{resources} // 返回资源对象的列表 【POST】 /{version}/{resources} // 返回新生成的资源对象 【PUT】 /{version}/{resources}/{resource_id} // 返回完整的资源对象 【PATCH】 /{version}/{resources}/{resource_id} // 返回完整的资源对象 【DELETE】 /{version}/{resources}/{resource_id} // 状态码 200,返回完整的资源对象。 // 状态码 204,返回一个空文档
如果是单条数据,则返回一个对象的 JSON 字符串。
1 2 3 4 5 6 7 8 HTTP/1.1 200 OK{ "id" : "01234567-89ab-cdef-0123-456789abcdef", "name" : "example", "created_time": 1496676420000, "updated_time": 1496676420000, ... }
如果是列表数据,则返回一个封装的结构体。
1 2 3 4 5 6 7 8 9 10 11 12 13 14 HTTP/1.1 200 OK{ "count":100, "items":[ { "id" : "01234567-89ab-cdef-0123-456789abcdef", "name" : "example", "created_time": 1496676420000, "updated_time": 1496676420000, ... }, ... ] }
一个完整的案例 最后,我们使用一个完整的案例将前面介绍的知识整合起来。这里,使用“获取用户列表”的案例。
1 2 3 4 5 6 7 8 9 10 11 12 13 14 15 16 17 18 19 20 21 22 23 24 25 26 27 28 29 30 31 32 33 34 35 36 【GET】 /v1/users?[&keyword=xxx][&enable=1][&offset=0][&limit=20] 获取用户列表 功能说明:获取用户列表 请求方式:GET 参数说明 - keyword: 模糊查找的关键字。[选填] - enable: 启用状态[1-启用 2-禁用]。[选填] - offset: 获取位置偏移,从 0 开始。[选填] - limit: 每次获取返回的条数,缺省为 20 条,最大不超过 100。 [选填] 响应内容 HTTP/1.1 200 OK{ "count":100, "items":[ { "id" : "01234567-89ab-cdef-0123-456789abcdef", "name" : "example", "created_time": 1496676420000, "updated_time": 1496676420000, ... }, ... ] } 失败响应 HTTP/1.1 403 UC/AUTH_DENIED Content-Type : application/json{ "code": "INVALID_ARGUMENT", "message": "{error message}", "cause": "{cause message}", "request_id": "01234567-89ab-cdef-0123-456789abcdef", "host_id": "{server identity}", "server_time": "2014-01-01T12:00:00Z" } 错误代码 - 403 UC/AUTH_DENIED 授权受限
什么是幂等性 HTTP 幂等方法,是指无论调用多少次都不会有不同结果的 HTTP 方法。不管你调用一次,还是调用一百次,一千次,结果都是相同的。
1 2 3 4 5 6 GET /tickets # 获取ticket列表 GET /tickets/12 # 查看某个具体的ticket POST /tickets # 新建一个ticket PUT /tickets/12 # 更新ticket 12 PATCH /tickets/12 # 更新ticket 12 DELETE /tickets/12 # 删除ticekt 12
HTTP GET 方法 HTTP GET 方法,用于获取资源,不管调用多少次接口,结果都不会改变,所以是幂等的。
1 2 GET /tickets # 获取ticket列表 GET /tickets/12 # 查看某个具体的ticket
只是查询数据,不会影响到资源的变化,因此我们认为它幂等。
值得注意,幂等性指的是作用于结果而非资源本身。怎么理解呢?例如,这个 HTTP GET 方法可能会每次得到不同的返回内容,但并不影响资源。
可能你会问有这种情况么?当然有咯。例如,我们有一个接口获取当前时间,我们就应该设计成
1 GET /service_time # 获取服务器当前时间
它本身不会对资源本身产生影响,因此满足幂等性。
HTTP POST 方法 HTTP POST 方法是一个非幂等方法,因为调用多次,都将产生新的资源。
1 POST /tickets # 新建一个ticket
因为它会对资源本身产生影响,每次调用都会有新的资源产生,因此不满足幂等性。
HTTP PUT 方法 HTTP PUT 方法是不是幂等的呢?我们来看下
1 PUT /tickets/12 # 更新ticket 12
因为它直接把实体部分的数据替换到服务器的资源,我们多次调用它,只会产生一次影响,但是有相同结果的 HTTP 方法,所以满足幂等性
HTTP PATCH 方法 HTTP PATCH 方法是非幂等的。HTTP POST 方法和 HTTP PUT 方法可能比较好理解,但是 HTTP PATCH 方法只是更新部分资源,怎么是非幂等的呢?
因为,PATCH 提供的实体则需要根据程序或其它协议的定义,解析后在服务器上执行,以此来修改服务器上的资源。换句话说,PATCH 请求是会执行某个程序的,如果重复提交,程序可能执行多次,对服务器上的资源就可能造成额外的影响,这就可以解释它为什么是非幂等的了。
可能你还不能理解这点。我们举个例子
1 PATCH /tickets/12 # 更新ticket 12
此时,我们服务端对方法的处理是,当调用一次方法,更新部分字段,将这条 ticket 记录的操作记录加一,这次,每次调用的资源是不是变了呢,所以它是有可能是非幂等的操作
HTTP DELETE 方法 HTTP DELETE 方法用于删除资源,会将资源删除。
1 DELETE /tickets/12 # 删除ticekt 12
调用一次和多次对资源产生影响是相同的,所以也满足幂等性。
如何设计符合幂等性的高质量 RESTful API HTTP GET vs HTTP POST 也许,你会想起一个面试题。HTTP 请求的 GET 与 POST 方式有什么区别? 你可能会回答到:GET 方式通过 URL 提交数据,数据在 URL 中可以看到;POST 方式,数据放置在 HTML HEADER 内提交。但是,我们现在从 RESTful 的资源角度来看待问题,HTTP GET 方法是幂等的,所以它适合作为查询操作,HTTP POST 方法是非幂等的,所以用来表示新增操作。
但是,也有例外,我们有的时候可能需要把查询方法改造成 HTTP POST 方法。比如,超长(1k)的 GET URL 使用 POST 方法来替代,因为 GET 受到 URL 长度的限制。虽然,它不符合幂等性,但是它是一种折中的方案。
HTTP POST vs HTTP PUT 对于 HTTP POST 方法和 HTTP PUT 方法,我们一般的理解是 POST 表示创建资源,PUT 表示更新资源。当然,这个是正确的理解。
但是,实际上,两个方法都用于创建资源,更为本质的差别是在幂等性。HTTP POST 方法是非幂等,所以用来表示创建资源,HTTP PUT 方法是幂等的,因此表示更新资源更加贴切。
HTTP PUT vs HTTP PATCH 此时,你看会有另外一个问题。HTTP PUT 方法和 HTTP PATCH 方法,都是用来表述更新资源,它们之间有什么区别呢?我们一般的理解是 PUT 表示更新全部资源,PATCH 表示更新部分资源。首先,这个是我们遵守的第一准则。根据上面的描述,PATCH 方法是非幂等的,因此我们在设计我们服务端的 RESTful API 的时候,也需要考虑。如果,我们想要明确的告诉调用者我们的资源是幂等的,我的设计更倾向于使用 HTTP PUT 方法。