Spring Security SpringSspecurity 框架简介 1.1 概要 Spring 是非常流行和成功的 Java 应用开发框架,Spring Security 正是 Spring 家族中的 成员。Spring Security 基于 Spring 框架,提供了一套 Web 应用安全性的完整解决方 案。
正如你可能知道的关于安全方面的两个主要区域是“认证”和“授权”(或者访问控 制),一般来说,Web 应用的安全性包括用户认证(Authentication)和用户授权 (Authorization)两个部分,这两点也是 Spring Security 重要核心功能。
(1)用户认证指的是:==验证某个用户是否为系统中的合法主体,也就是说用户能否访问 该系统==。用户认证一般要求用户提供用户名和密码。系统通过校验用户名和密码来完成认 证过程。通俗点说就是系统认为用户是能登录 。
(2)==用户授权指的是验证某个用户是否有权限执行某个操作==。在一个系统中,不同用户 所具有的权限是不同的。比如对一个文件来说,有的用户只能进行读取,而有的用户可以 进行修改。一般来说,系统会为不同的用户分配不同的角色,而每个角色则对应一系列的 权限。通俗点讲就是系统判断用户是否有权限去做某些事情。
1.3 同款产品对比 1.3.1 Spring Security SpringSecurity 特点:
⚫ 和 Spring 无缝整合。
⚫ 全面的权限控制。
⚫ 专门为 Web 开发而设计。
◼旧版本不能脱离 Web 环境使用。
◼新版本对整个框架进行了分层抽取,分成了核心模块和 Web 模块。单独 引入核心模块就可以脱离 Web 环境。
⚫ 重量级。
1.3.2 Shiro Apache 旗下的轻量级权限控制框架
特点:
⚫ 轻量级。Shiro 主张的理念是把复杂的事情变简单。针对对性能有更高要求 的互联网应用有更好表现。
⚫ 通用性。
◼好处:不局限于 Web 环境,可以脱离 Web 环境使用。
◼缺陷:在 Web 环境下一些特定的需求需要手动编写代码定制。
Spring Security 是 Spring 家族中的一个安全管理框架,实际上,在 Spring Boot 出现之 前,Spring Security 就已经发展了多年了,但是使用的并不多,安全管理这个领域,一直 是 Shiro 的天下
相对于 Shiro,在 SSM 中整合 Spring Security 都是比较麻烦的操作,所以,Spring Security 虽然功能比 Shiro 强大,但是使用反而没有 Shiro 多(Shiro 虽然功能没有 Spring Security 多,但是对于大部分项目而言,Shiro 也够用了)。
因此,一般来说,常见的安全管理技术栈的组合是这样的:
• SSM + Shiro
• Spring Boot/Spring Cloud + Spring Security
以上只是一个推荐的组合而已,如果单纯从技术上来说,无论怎么组合,都是可以运行 的。
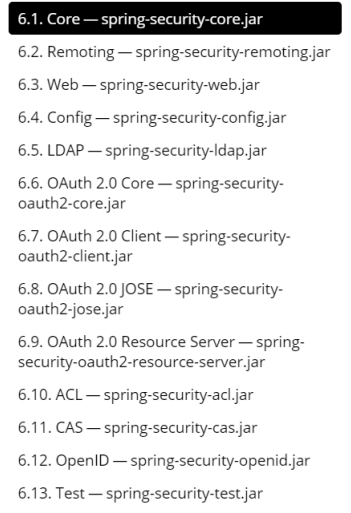
1.4 模块划分
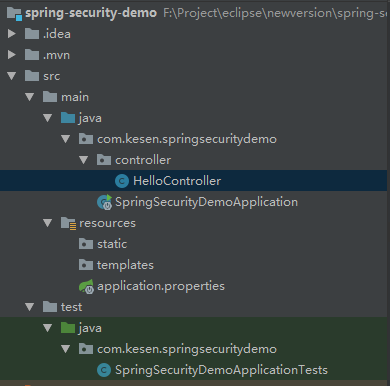
SpringSecurity 入门案例 1、新建springboot工程
2、引入web和spring-security启动器
1 2 3 4 5 6 7 8 <dependency > <groupId > org.springframework.boot</groupId > <artifactId > spring-boot-starter-security</artifactId > </dependency > <dependency > <groupId > org.springframework.boot</groupId > <artifactId > spring-boot-starter-web</artifactId > </dependency >
3、新建HelloController
1
2
3
4
5
6
7
8
9
@RestController @RequestMapping("/hello") public class HelloController @GetMapping("/security") public String hello () return "Hello security" ; } }
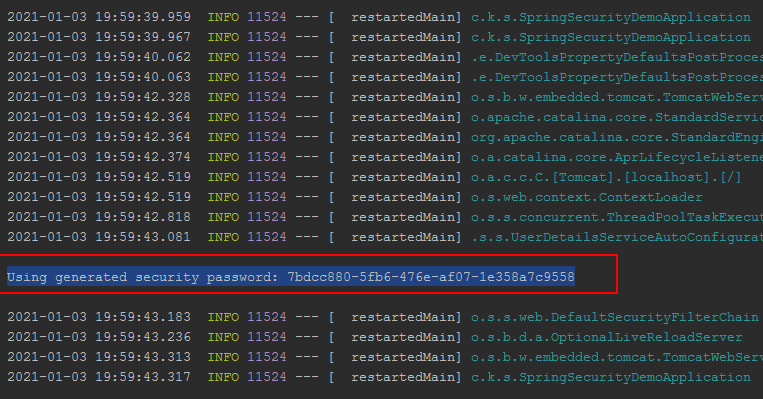
4、启动项目
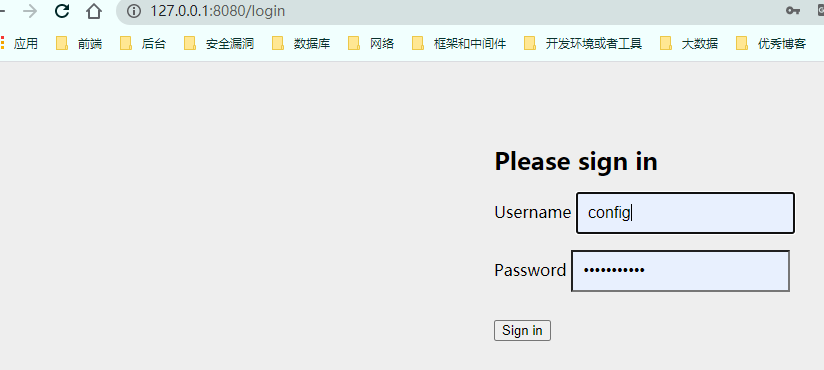
5、访问资源
1 http://127.0.0.1:8080/hello/security
6、重定向到登录页
7、登录
Username:user
Password:7bdcc880-5fb6-476e-af07-1e358a7c9558
权限管理中的相关概念 主体 英文单词:principal
使用系统的用户或设备或从其他系统远程登录的用户等等。简单说就是谁使用系 统谁就是主体。
认证 英文单词:authentication
权限管理系统确认一个主体的身份,允许主体进入系统。简单说就是“主体”证 明自己是谁。 笼统的认为就是以前所做的登录操作。
授权 英文单词:authorization
将操作系统的“权力”“授予”“主体”,这样主体就具备了操作系统中特定功 能的能力。 所以简单来说,授权就是给用户分配权限。
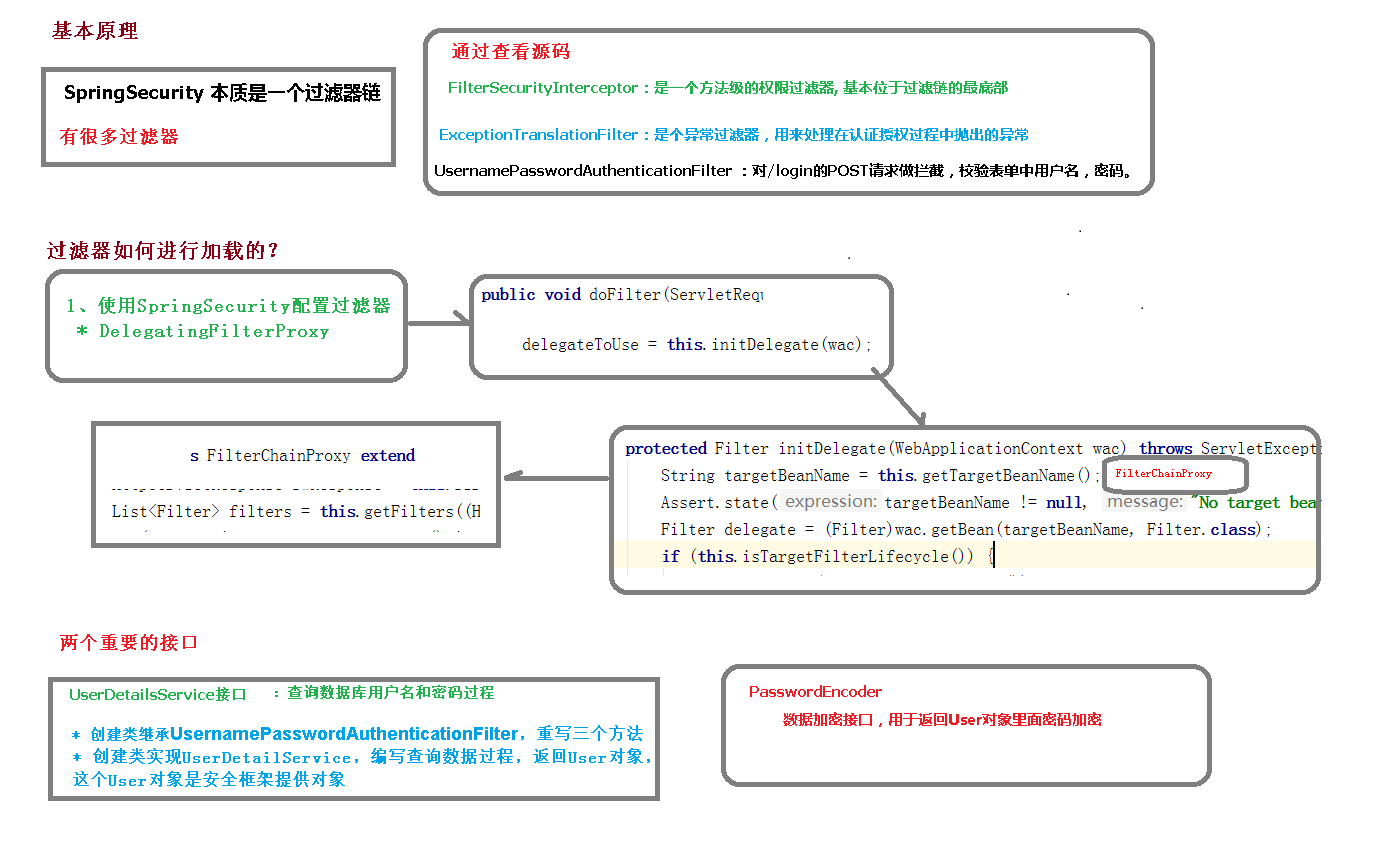
SpringSecurity 基本原理 SpringSecurity 本质是一个过滤器链: 从启动是可以获取到过滤器链:
1 Creating filter chain: any request, [org.springframework.security.web.context.request.async.WebAsyncManagerIntegrationFilter@41417eda, org.springframework.security.web.context.SecurityContextPersistenceFilter@7ad34a20, org.springframework.security.web.header.HeaderWriterFilter@257f4a8, org.springframework.security.web.csrf.CsrfFilter@17034aa6, org.springframework.security.web.authentication.logout.LogoutFilter@391e5bb2, org.springframework.security.web.authentication.UsernamePasswordAuthenticationFilter@38c53a44, org.springframework.security.web.authentication.ui.DefaultLoginPageGeneratingFilter@41c5e37, org.springframework.security.web.authentication.ui.DefaultLogoutPageGeneratingFilter@2e820a2e, org.springframework.security.web.authentication.www.BasicAuthenticationFilter@6a9cb9e5, org.springframework.security.web.savedrequest.RequestCacheAwareFilter@5c015c2a, org.springframework.security.web.servletapi.SecurityContextHolderAwareRequestFilter@239a68db, org.springframework.security.web.authentication.AnonymousAuthenticationFilter@28edfd58, org.springframework.security.web.session.SessionManagementFilter@77b7b349, org.springframework.security.web.access.ExceptionTranslationFilter@70b1b0fc, org.springframework.security.web.access.intercept.FilterSecurityInterceptor@56b861ef]
UserDetailsService 接口讲解 当什么也没有配置的时候,账号和密码是由 Spring Security 定义生成的。而在实际项目中 账号和密码都是从数据库中查询出来的。 所以我们要通过自定义逻辑控制认证逻辑。
如果需要自定义逻辑时,只需要实现 UserDetailsService 接口即可。接口定义如下:
UserDetailsService
1
2
3
4
public interface UserDetailsService UserDetails loadUserByUsername (String var1) throws UsernameNotFoundException ; }
使用方式:
实现``UserDetailsService类,并实现方法loadUserByUsername`
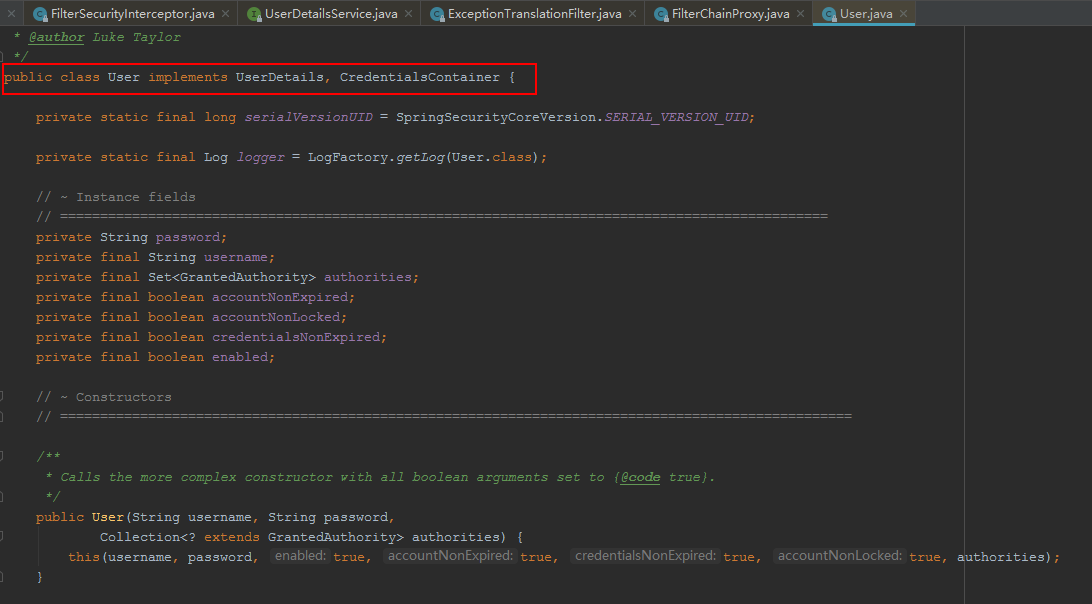
UserDetails
1
2
3
4
5
6
7
8
9
10
11
12
13
14
15
16
17
18
19
20
21
22
23
public interface UserDetails extends Serializable Collection<? extends GrantedAuthority> getAuthorities(); String getPassword () ; String getUsername () ; boolean isAccountNonExpired () boolean isAccountNonLocked () boolean isCredentialsNonExpired () boolean isEnabled () }
spring-security帮我们实现了一个implements UserDetails 的类User,我们只需要传用户名、密码、权限等参数
1
2
3
4
public User (String username, String password, Collection<? extends GrantedAuthority> authorities) this (username, password, true , true , true , true , authorities); }
1
2
3
4
5
6
7
8
9
10
11
12
13
14
15
16
17
public User (String username, String password, boolean enabled, boolean accountNonExpired, boolean credentialsNonExpired, boolean accountNonLocked, Collection<? extends GrantedAuthority> authorities) if (((username == null ) || "" .equals(username)) || (password == null )) { throw new IllegalArgumentException( "Cannot pass null or empty values to constructor" ); } this .username = username; this .password = password; this .enabled = enabled; this .accountNonExpired = accountNonExpired; this .credentialsNonExpired = credentialsNonExpired; this .accountNonLocked = accountNonLocked; this .authorities = Collections.unmodifiableSet(sortAuthorities(authorities)); }
⚫ 方法参数 username
表示用户名。此值是客户端表单传递过来的数据。默认情况下必须叫 username,否则无 法接收。
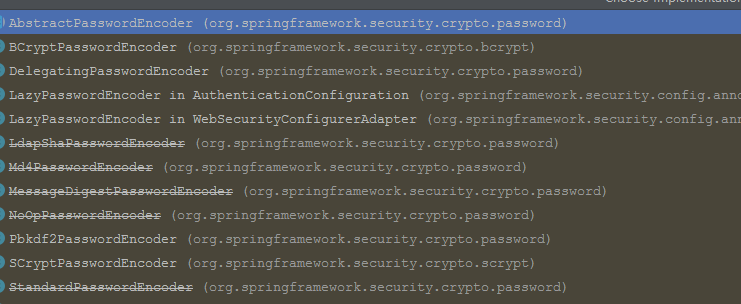
PasswordEncoder 接口讲解 1 2 3 4 5 6 7 8 9 10 11 12 13 14 15 16 17 18 19 20 21 22 23 24 25 26 27 28 29 30 31 public interface PasswordEncoder String encode (CharSequence rawPassword) ; boolean matches (CharSequence rawPassword, String encodedPassword) default boolean upgradeEncoding (String encodedPassword) return false ; } }
接口实现类
BCryptPasswordEncoder 是 Spring Security 官方推荐的密码解析器,平时多使用这个解析器。
BCryptPasswordEncoder 是对 bcrypt 强散列方法的具体实现。是基于 Hash 算法实现的单向加密。可以通过 strength 控制加密强度,默认 10
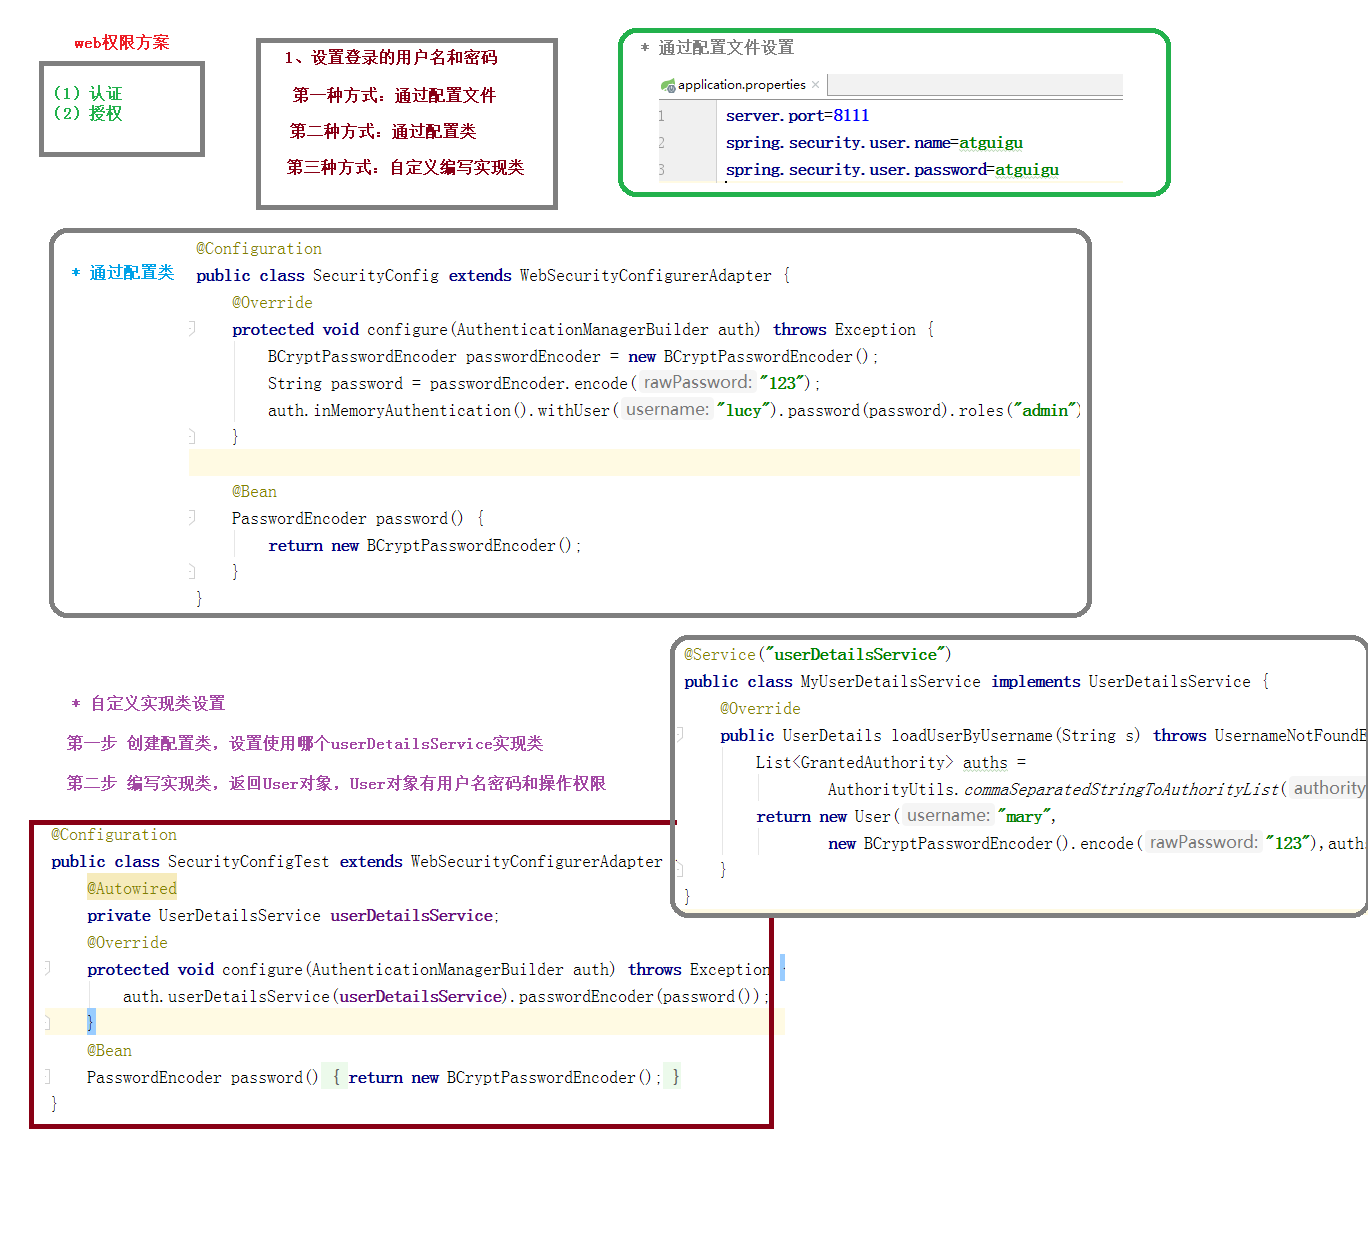
Web权限方案 认证-设置用户名和密码
第一种方式:配置文件
application.properties
1
2
spring.security.user.name = kesen spring.security.user.password =
第二种方式:配置类 1 2 3 4 5 6 7 8 9 10 11 12 13 14 @Configuration public class SecurityConfig extends WebSecurityConfigurerAdapter @Override protected void configure (AuthenticationManagerBuilder auth) throws Exception BCryptPasswordEncoder passwordEncoder = new BCryptPasswordEncoder(); String password = passwordEncoder.encode("123" ); auth.inMemoryAuthentication().withUser("huangkai" ).password(password).roles("admin" ); } @Bean PasswordEncoder passwordEncoder () { return new BCryptPasswordEncoder(); } }
第三种方式:通过实现UserDetailService
第一步:编写UserDetailService实现类,返回User对象,User对象有用户名、密码、权限列表
1 2 3 4 5 6 7 8 9 10 11 12 13 14 15 @Service public class MyUserDetailService implements UserDetailsService @Override public UserDetails loadUserByUsername (String username) throws UsernameNotFoundException List<GrantedAuthority> grants = AuthorityUtils.commaSeparatedStringToAuthorityList("admin" ); BCryptPasswordEncoder passwordEncoder = new BCryptPasswordEncoder(); return new User("kesen" , passwordEncoder.encode("123" ), grants); } }
第二步:创建配置类,设置使用哪个UserDetailService实现类
1 2 3 4 5 6 7 8 9 10 11 12 13 14 15 16 @Configuration public class SecurityConfig extends WebSecurityConfigurerAdapter @Autowired private UserDetailsService myUserDetailService; @Override protected void configure (AuthenticationManagerBuilder auth) throws Exception auth.userDetailsService(myUserDetailService).passwordEncoder(passwordEncoder()); } @Bean PasswordEncoder passwordEncoder () { return new BCryptPasswordEncoder(); } }
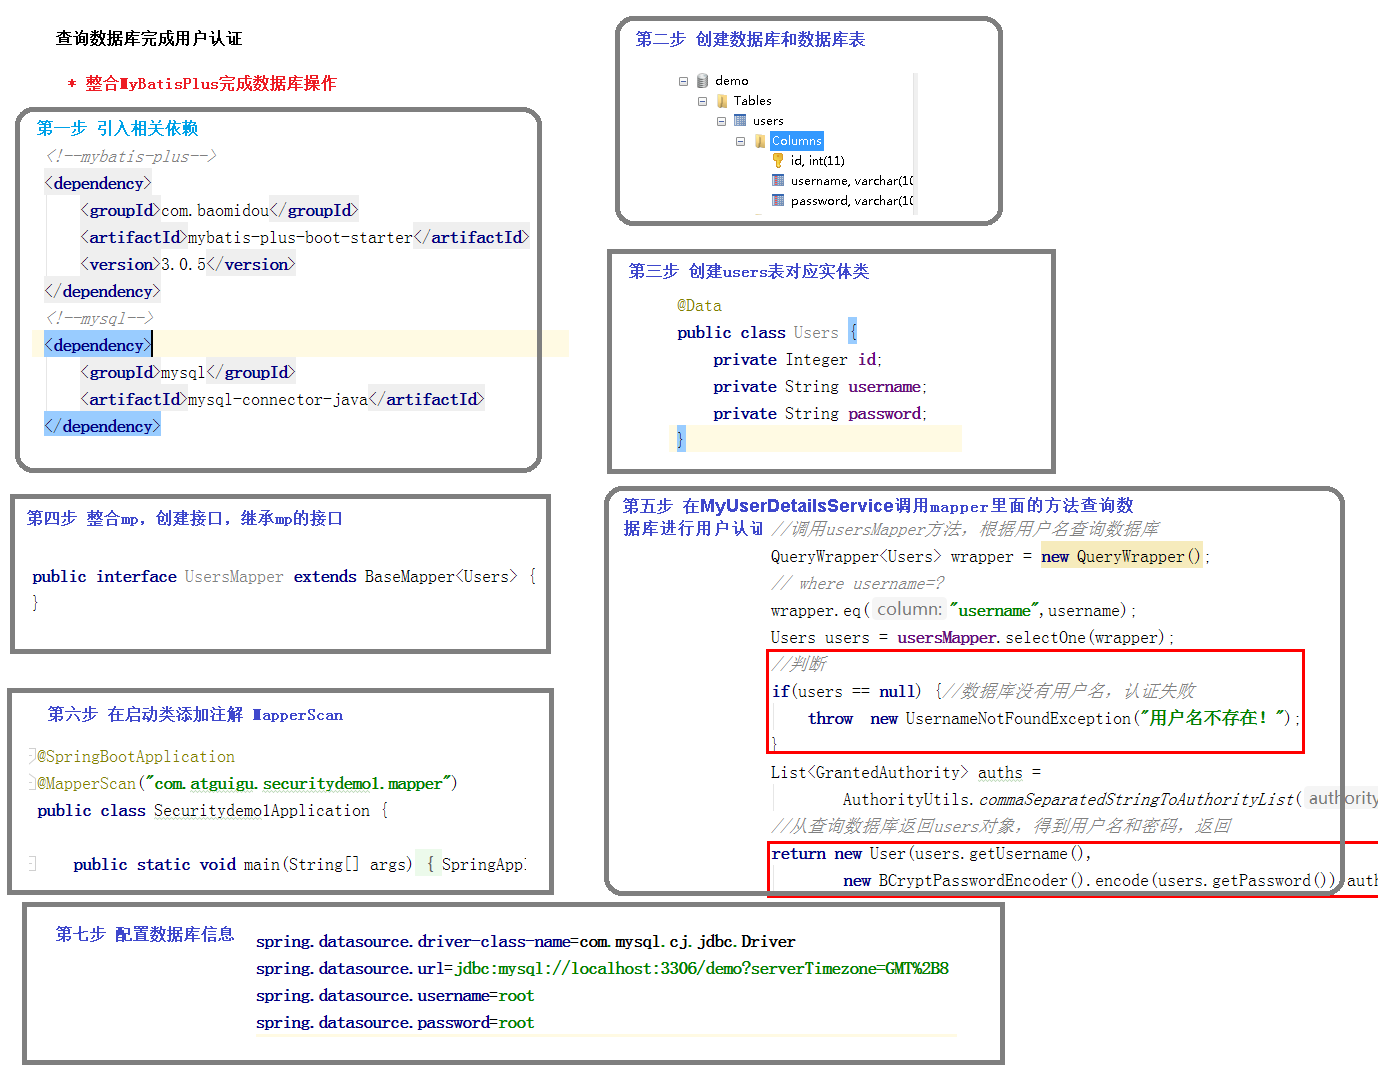
认证-查询数据库认证
第一步:添加依赖 1 2 3 4 5 6 7 8 9 10 11 12 <dependency > <groupId > com.baomidou</groupId > <artifactId > mybatis-plus-boot-starter</artifactId > <version > 3.0.5</version > </dependency > <dependency > <groupId > mysql</groupId > <artifactId > mysql-connector-java</artifactId > <version > 8.0.17</version > </dependency >
第二步:实体类 1 2 3 4 5 6 7 8 9 10 11 12 13 14 15 16 17 18 19 20 21 22 23 24 25 26 27 public class User private long id; private String name; private String password; public long getId () return id; } public void setId (long id) this .id = id; } public String getName () return name; } public void setName (String name) this .name = name; } public String getPassword () return password; } public void setPassword (String password) this .password = password; } }
第三步:创建数据库
第四步:添加Mapper接口 1 2 3 public interface UserMapper extends BaseMapper <User > }
第五步:完善UserDetailsService查询用户 1 2 3 4 5 6 7 8 9 10 11 12 13 14 15 16 17 18 19 20 21 22 23 24 @Service(value = "myUserDetailService") public class MyUserDetailService implements UserDetailsService @Autowired private UserMapper userMapper; @Override public UserDetails loadUserByUsername (String username) throws UsernameNotFoundException List<GrantedAuthority> grants = AuthorityUtils.commaSeparatedStringToAuthorityList("admin" ); BCryptPasswordEncoder passwordEncoder = new BCryptPasswordEncoder(); QueryWrapper<com.kesen.springsecuritydemo.entity.User> wrapper = new QueryWrapper<>(); wrapper.eq("name" , username); com.kesen.springsecuritydemo.entity.User user = userMapper.selectOne(wrapper); if (null == user) { throw new UsernameNotFoundException("用户名不存在!" ); } return new User(user.getName(), passwordEncoder.encode(user.getPassword()), grants); } }
第六步:添加MapperScan 1 2 3 4 5 6 7 8 9 @MapperScan("com.kesen.springsecuritydemo.mapper") @SpringBootApplication public class SpringSecurityDemoApplication public static void main (String[] args) SpringApplication.run(SpringSecurityDemoApplication.class, args); } }
第七步:配置数据源 1 2 3 4 spring.datasource.driver-class-name =com.mysql.cj.jdbc.Driver spring.datasource.url =jdbc:mysql://localhost:3306/shiro?serverTimezone=GMT%2B8 spring.datasource.username =root spring.datasource.password =root
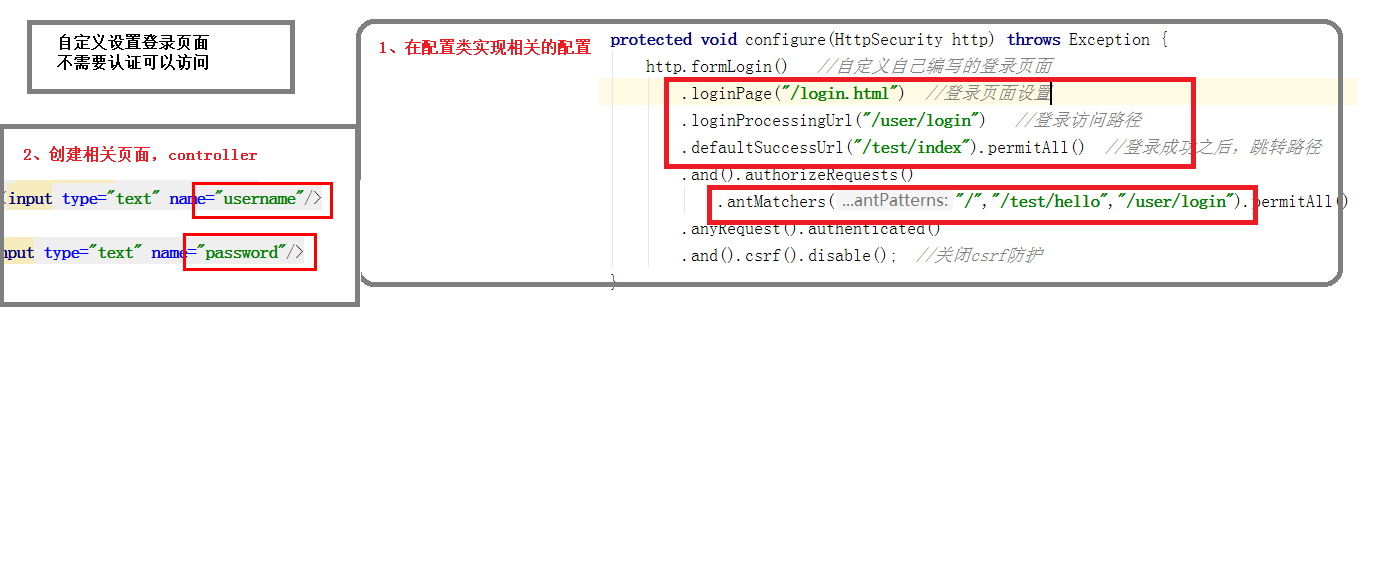
自定义设置登录页面
第一步:配置类实现相关配置 1 2 3 4 5 6 7 8 9 10 11 12 13 @Override protected void configure (HttpSecurity http) throws Exception http.formLogin() .loginPage("/login.html" ) .loginProcessingUrl("/user/login" ) .defaultSuccessUrl("/hello/success" ) .and() .authorizeRequests() .antMatchers("/" ,"/hello/view" ,"/user/login" ,"/login.html" ).permitAll() .anyRequest().authenticated() .and() .csrf().disable(); }
第二步:创建登录页和Controller 1 2 3 4 5 6 7 8 9 10 11 12 13 14 15 <!DOCTYPE html > <html lang ="en" > <head > <meta charset ="UTF-8" > <title > Title</title > </head > <body > <form action ="/user/login" method ="post" > 用户名:<input type ="text" name ="username" > <br /> 密码:<input type ="password" name ="password" > <input type ="submit" value ="login" > </form > </body > </html >
web权限方案-基于角色或者权限的访问控制
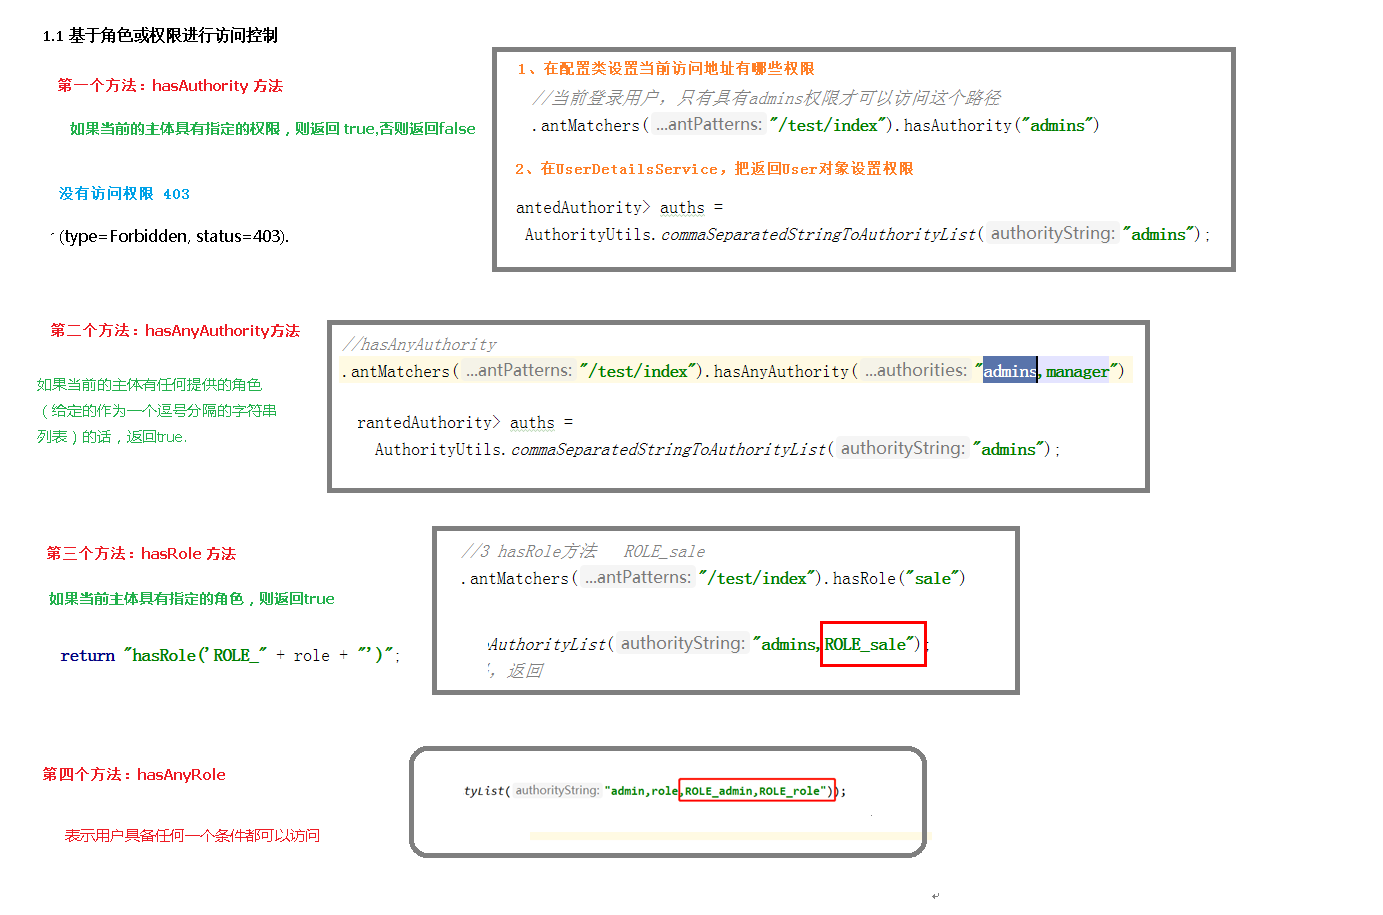
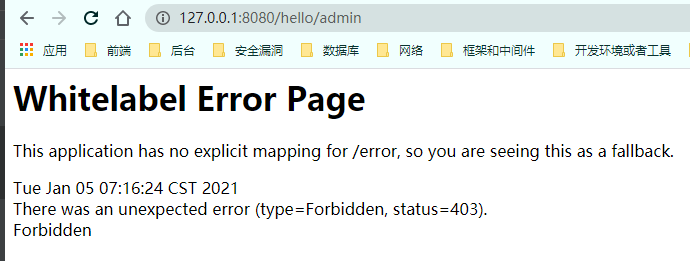
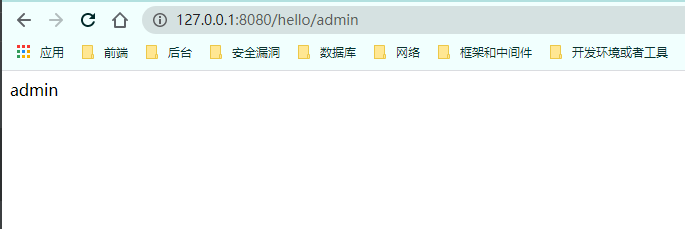
第一种: hasAuthority 访问/hello/admin需要admin权限
1 2 3 4 5 6 7 8 9 10 11 12 13 14 @Override protected void configure (HttpSecurity http) throws Exception http.formLogin() .loginPage("/login.html" ) .loginProcessingUrl("/user/login" ) .defaultSuccessUrl("/hello/success" ) .and() .authorizeRequests() .antMatchers("/" ,"/hello/view" ,"/user/login" ,"/login.html" ).permitAll() .antMatchers("/hello/admin" ).hasAuthority("admin" ) .anyRequest().authenticated() .and() .csrf().disable(); }
只赋予audit权限
1 List<GrantedAuthority> grants = AuthorityUtils.commaSeparatedStringToAuthorityList("audit" );
==hasAuthority 要求用户拥有所有的权限才能访问==
第二种:hasAnyAuthority ==hasAnyAuthority要求用户拥有其中一个权限便可以访问==
配置
1 .antMatchers("/hello/admin" ).hasAnyAuthority("admin" ,"audit" )
赋予权限
1 List<GrantedAuthority> grants = AuthorityUtils.commaSeparatedStringToAuthorityList("audit,config" );
第三种:hasRole
1 .antMatchers("/hello/admin" ).hasRole("sale" )
1 2 3 4 5 6 7 8 9 10 private static String hasRole (String role) Assert.notNull(role, "role cannot be null" ); if (role.startsWith("ROLE_" )) { throw new IllegalArgumentException( "role should not start with 'ROLE_' since it is automatically inserted. Got '" + role + "'" ); } return "hasRole('ROLE_" + role + "')" ; }
1 List<GrantedAuthority> grants = AuthorityUtils.commaSeparatedStringToAuthorityList("audit,config,ROLE_sale" );
第四种:hasAnyRole hasAnyRole和hasRole的区别在于,它只要求用户拥有其中一个角色便可以访问,hasRole要求用户拥有权限控制中的全部角色。
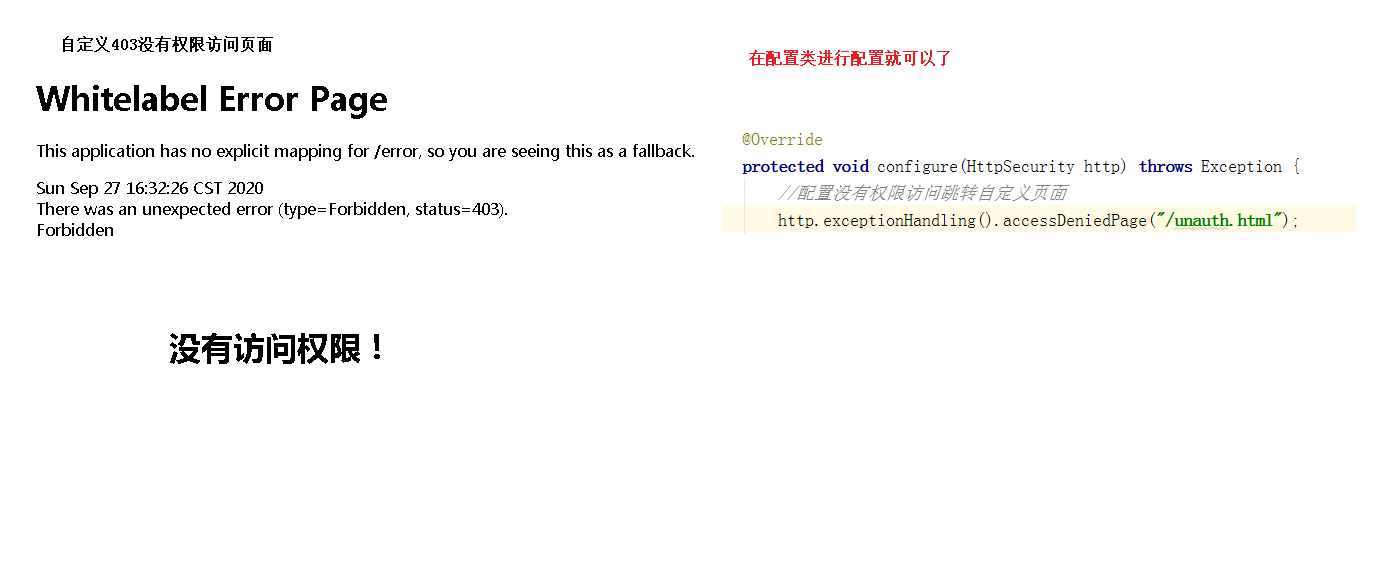
自定义403页面
配置 1 http.exceptionHandling().accessDeniedPage("/unauth.html" );
页面 1 2 3 4 5 6 7 8 9 10 <!DOCTYPE html > <html lang ="en" > <head > <meta charset ="UTF-8" > <title > Forbidden</title > </head > <body > <h1 > 没有访问权限</h1 > </body > </html >
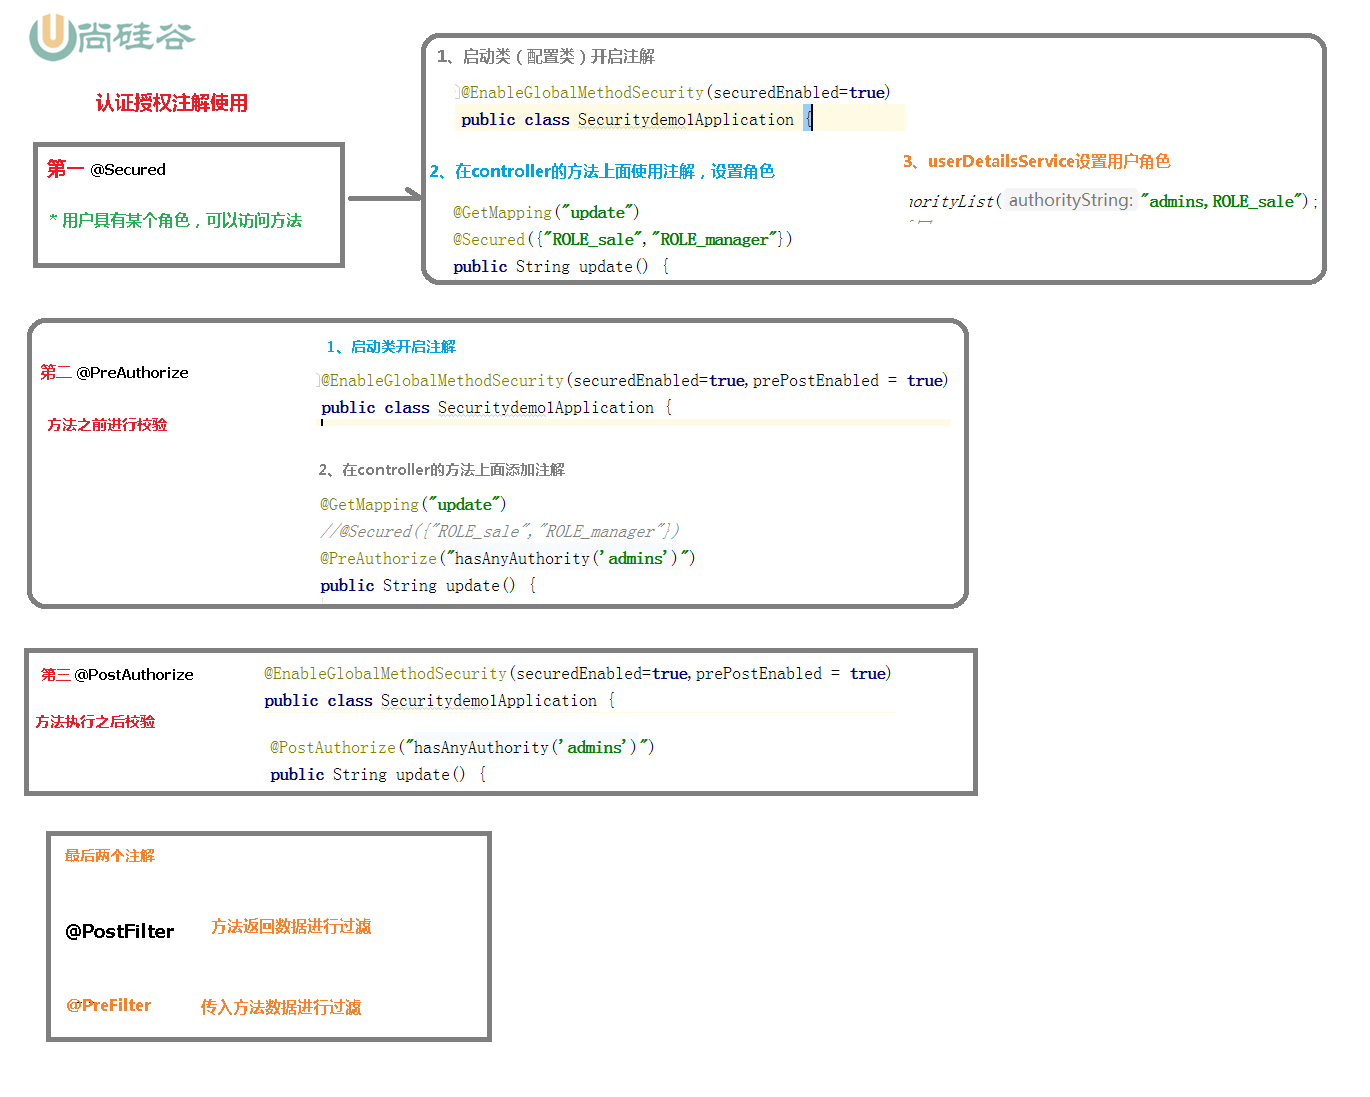
注解使用
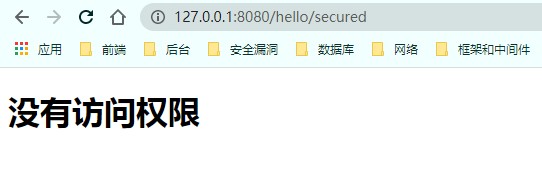
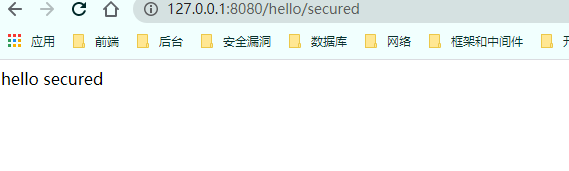
@Secured开启注解 1 @EnableGlobalMethodSecurity(securedEnabled = true)
先看没有角色的情况
1 2 3 4 5 6 @GetMapping("/secured") @Secured({"ROLE_normal","ROLE_admin"}) public String secured () return "hello secured" ; } }
用户拥有的角色: 1 List<GrantedAuthority> grants = AuthorityUtils.commaSeparatedStringToAuthorityList("audit,config,ROLE_sale" );
结果
给用户添加角色: 1 List<GrantedAuthority> grants = AuthorityUtils.commaSeparatedStringToAuthorityList("audit,config,ROLE_sale, ROLE_admin" );
结果
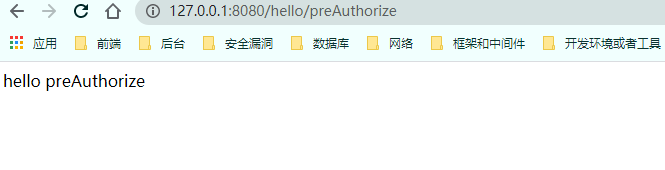
@PreAuthorize==在进入方法前进行权限校验==
配置 1 @EnableGlobalMethodSecurity(securedEnabled = true, prePostEnabled = true)
使用 1 2 3 4 5 6 @PreAuthorize("hasAnyAuthority('config')") @GetMapping("/preAuthorize") public String preAuthorize () return "hello preAuthorize" ; }
1 List<GrantedAuthority> grants = AuthorityUtils.commaSeparatedStringToAuthorityList("audit,config,ROLE_sale, ROLE_admin" );
验证
@PostAuthorize==在方法执行之后进行校验==
配置 1 @EnableGlobalMethodSecurity(securedEnabled = true, prePostEnabled = true)
使用 1 2 3 4 5 6 @PostAuthorize("hasAnyRole('管理员')") @GetMapping("/postAuthorize") public String postAuthorize () System.out.println("postAuthorize" ); return "hello postAuthorize" ; }
1 List<GrantedAuthority> grants = AuthorityUtils.commaSeparatedStringToAuthorityList("audit,config,ROLE_sale, ROLE_admin" );
验证
@PostFilter==权限验证之后对数据进行过滤==
==留下filter匹配的数据==
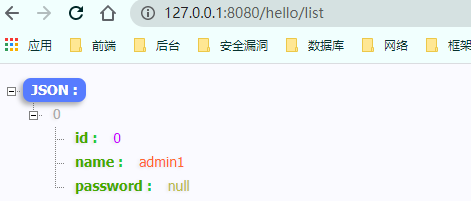
使用 1 2 3 4 5 6 7 8 9 10 11 12 13 14 @GetMapping("/list") @PreAuthorize("hasRole('ROLE_admin')") @PostFilter("filterObject.name == 'admin1'") @ResponseBody public List<User> getAllUser () ArrayList<User> list = new ArrayList<>(); User user1 = new User(); user1.setName("admin1" ); User user2= new User(); user2.setName("admin2" ); list.add(user1); list.add(user2); return list; }
测试
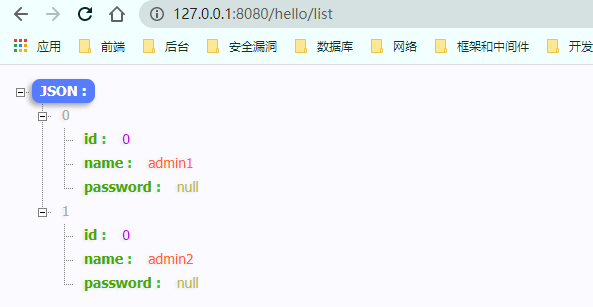
测试样例2 1 2 3 4 5 6 7 8 9 10 11 12 13 14 15 16 @GetMapping("/list") @PreAuthorize("hasRole('ROLE_admin')") @PostFilter("filterObject.name == 'admin1' || filterObject.name == 'admin2'") @ResponseBody public List<User> getAllUser () ArrayList<User> list = new ArrayList<>(); User user1 = new User(); user1.setName("admin1" ); User user2= new User(); user2.setName("admin2" ); User user3= new User(); list.add(user1); list.add(user2); list.add(user3); return list; }
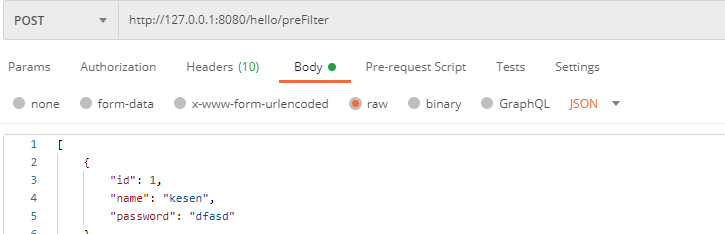
@PreFilter==进入控制器之前对数据进行过滤==
使用 1 2 3 4 5 6 7 8 9 10 @PostMapping("/preFilter") @PreAuthorize("hasRole('ROLE_admin')") @PreFilter(value = "filterObject.id%2==0") public List<User> getTestPreFilter (@RequestBody List<User> list) list.forEach(t-> { System.out.println(t.getId()+"\t" +t.getName()); }); return list; }
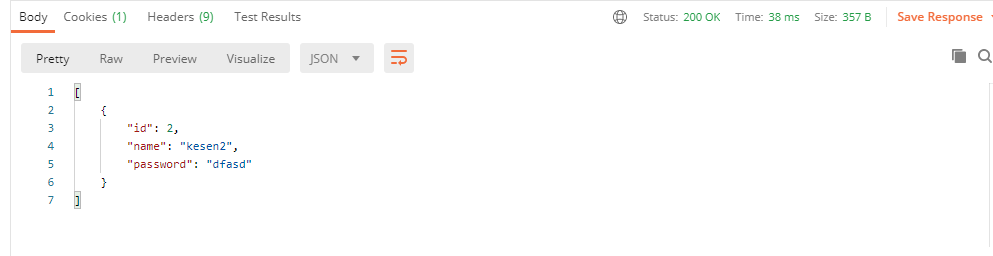
测试
1 2 3 4 5 6 7 8 9 10 11 12 13 14 15 16 17 [ { "id" : 1 , "name" : "kesen" , "password" : "dfasd" }, { "id" : 2 , "name" : "kesen2" , "password" : "dfasd" }, { "id" : 3 , "name" : "kesen3" , "password" : "dfasd" } ]
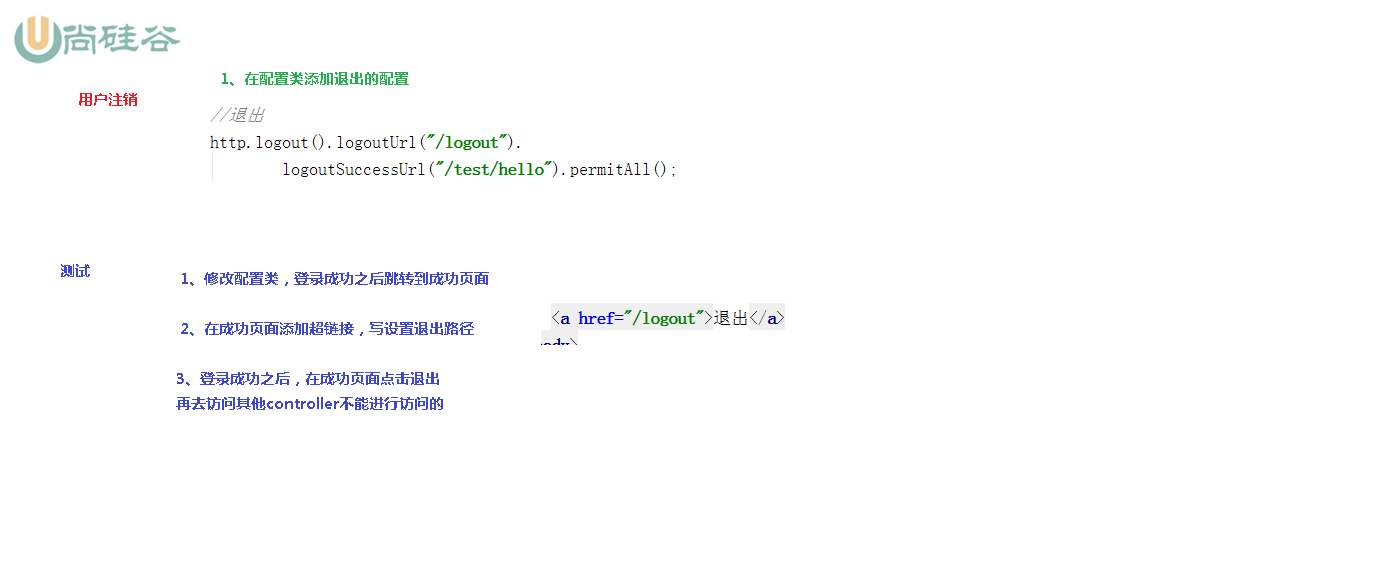
用户注销功能
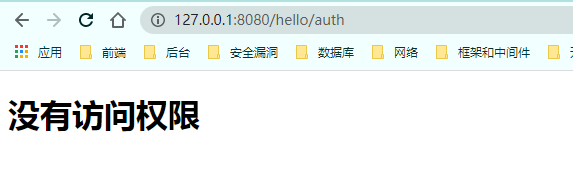
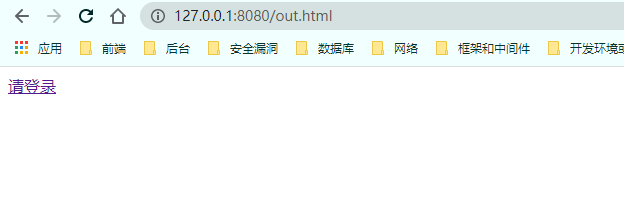
1 2 3 4 5 6 7 8 9 10 11 12 13 14 15 16 17 18 protected void configure (HttpSecurity http) throws Exception http.logout().logoutUrl("/logout" ).logoutSuccessUrl("/out.html" ).permitAll(); http.exceptionHandling().accessDeniedPage("/unauth.html" ); http.formLogin() .loginPage("/login.html" ) .loginProcessingUrl("/user/login" ) .defaultSuccessUrl("/success.html" ) .and() .authorizeRequests() .antMatchers("/" ,"/hello/view" ,"/user/login" ,"/login.html" ).permitAll() .antMatchers("/hello/admin" ).hasRole("sale" ) .antMatchers("/hello/auth" ).hasRole("auth" ) .anyRequest().authenticated() .and() .csrf().disable(); }
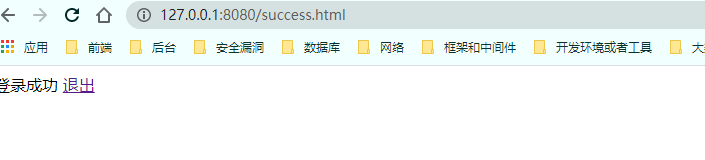
1 2 3 4 5 6 7 8 9 10 11 <!DOCTYPE html > <html lang ="en" > <head > <meta charset ="UTF-8" > <title > Title</title > </head > <body > 登录成功 <a href ="/logout" > 退出</a > </body > </html >
点击退出
==再次请求需要登录==